Friday, 28 September 2012

La Torta Pasqualina con le bietole per MTC


DSCN0879 - Torta Pasqualina_fetta


Questo mese la Vitto ospita L'MTC , in qualità di vincitrice dell' MTC di luglio 2012.

Io e la mamma di mio marito oggi abbiamo fatto la torta Pasqualina insieme per la prima volta. E ci siamo divertite molto. Due donne in cucina, quando c'è sintonia, lavorano bene, velocemente, anticipano l'una i bisogni dell'altra e in un battibaleno il piatto è pronto. Solo un attimo di sconcerto quando non trovavamo le cannucce (con il gomito come consiglia la Vitto) ma poi sono saltate fuori. Fiuuuuuu. :))) e non solo in senso figurato.


collage pasqualina_1


Ovviamente quando mia suocera mi ha visto arrivare a casa sua con la mia spianatoia lì per lì è rimasta interdetta ... lei ce l'ha la tavola per impastare!!!  Ma chiarito che la mia l'avevo portata per usarla come ripiano per le foto, la serenità ha continuato a regnare in cucina :)) D'altronde con tutti i raviêu (trad. ravioli), le torte pasqualine a gogo, mandilli de sea (trad. fazzoletti di seta o lasagnette) e pizze ripiene che vengono preparate, chi poteva dubitare?

Gli accordi li avevamo presi già da prima, io arrivavo, di corsa, con la maggior parte degli ingredienti maggiorana inclusa!, perchè mia suocera alle sue piante aveva chiesto già troppo , assemblavamo il tutto con tanto di servizio fotografico e poi io tornavo a casa, seeempre di corsa, con la teglia da infornare e  fotografare prima del buio  ; )


Raccolta collage pasqualina_2


Che dire...intanto, abbiamo seguito la ricetta, pesando ad occhio gli ingredienti, eh,eh! C'è chi può! (Non io, si intende) E l'impasto è venuto perfetto. Come ha detto la Vitto , niente manitoba, perchè 100 anni fa non c'era. Un solo cambiamento, niente sale, perché  mia suocera non lo mette. Dice che la pasta rimane più croccante senza. Sarà perché il sale assorbe l'umidità, giusto? E qui si potrebbe già iniziare a disquisire. Dariooooo dove sei? Confermi? Smentisci?

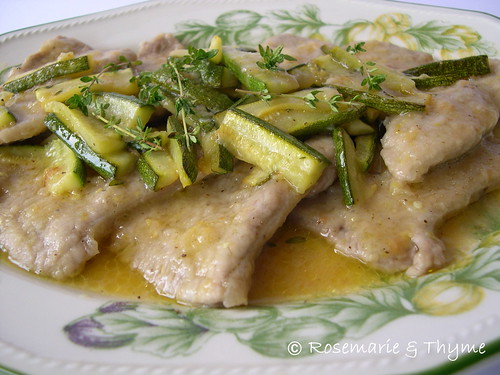
Ci siamo date il cambio nella lavorazione dell'impasto, intanto le bietole ormai cotte sono state scolate ben bene, poi tritate sul tagliere con la mezza luna, unite al trito e passate in padella. C'era un pezzettino di dado che spuntava lì sotto al trito, ma non lo dite a nessuno. Io non l'avrei messo...perché ho abolito il dado da anni. Ah, dimenticavo noi a Roma, niente prescinseua. Stracchino. Ma ho raccontato a mia suocera che la Vitto consiglia lo yogurt greco con la ricotta ed abbiamo deciso che la prossima volta facciamo una degustazione di torte Pasqualine e decidiamo quale ci piace di più.


Pennello per ungere la pasta? Naaaaaa. Probabilmente noi con l'olio, quindi, abbiamo abbondato, ma diteci voi. Le foto son proprio qui sotto.


Raccolta collage pasqualina_3


La chicca?
Il mattarello. Non è un mattarello. Proviene dal negozio di  Odone che era in Via Luccoli, dove teneva la contablità la nonna Iside, la nonna paterna di una nostra cugina.  Serviva per arrotolarvi la seta. Troppo forte, no? E devo dire che è perfetto per stendere un impasto lasciandolo leggermente ruvido.


Raccolta collage pasqualina_4

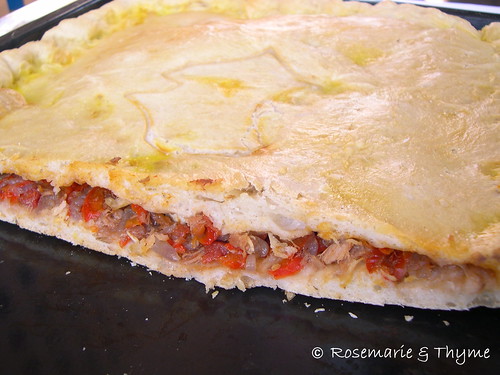
Abbiamo deciso per una sfoglia sotto un po' più spessa e quattro sopra che secondo me, vedendo la foto della Pasqualina della Vitto, dovevano essere più sottili. E come avete visto il ripieno non è a strati nella famiglia di mia suocera. Quindi mi incuriosisce molto la versione sempre della Vitto a strati. Nonché tutte le notizie di ripieni "alternativi", in particolare con la zucca. Vittoria ti contatterò per saperne di più.


DSCN0861 - La Torta Pasqualina con le bietole


P.S.
Per la fetta tagliata dovete attendere domani. Stasera dovevamo finire di mangiare l'Empanada Gallega di ieri (vedi post precedente) e la Pasqualina si doveva raffreddare e soprattutto insaporire. Verrà addentata  domani.

Complimenti a tutti, dopo aver postato ho dato una prima sbirciata e ci sono delle idee strepitose.


Ecco che cosa ci ha scrittoVittoria:


"Tutti possono cimentarsi in questa prova, il mattarello già lo abbiamo usato, la tecnica di tirare la sfoglia con i pugni infarinati si impara in fretta. Il segreto sta nel far riposare la pasta e nel non farla troppo dura.
La manitoba non è indispensabile (100 anni fa non c’era di sicuro) ma aiuta un po’ a evitare i buchi nella pasta quando si tira. Quindi vi aspetto a pugni infarinati e fantasia scatenata.


Piatto apparentemente semplicissimo nella povertà degli ingredienti, diventa una poesia di sapori e profumi che si sprigionano al taglio e ad ogni morso. Perfetta alternanza di consistenze (croccante, morbido, pastoso) e di colori (bianco, verde, giallo). Ho verificato sul campo una volta di più che non si può smettere di mangiarla. Vi prego solo di farla raffreddare perché se cercate di tagliarla e gustarla appena uscita dal forno resterete delusi: la pasta si sfalda, il ripieno troppo caldo non esprime sapori, ma bruciori. Aspettate almeno che sia tiepida! 

La Pasqualina, rigorosamente di bietole (a Pasqua i carciofi non ci sono o sono cari, i genovesi…maiiiii) è la torta salata ligure più famosa, ma le varianti sono moltissime, praticamente con ogni verdura ed erba disponibile 
Io vi propongo 2 versioni.

La prima è la Pasqualina più antica dove le bietole, il formaggio, le uova, non sono mescolati insieme, ma assemblati accostati, si mescoleranno solo in bocca regalandovi una gran differenza di sensazioni. Il formaggio utilizzato è la Prescinseua, la quagliata genovese, introvabile altrove, si può provare a sostituirla con un misto di ricotta e yogurt greco..oppure dovrò aprire uno spaccio di prescinseua.

La seconda è detta torta cappuccina; bietole e ricotta sono mischiate in un composto comprendente anche uova. Il sapore è diverso ma ugualmente squisito.
Poi ci sarebbe la versione “ricca” ai carciofi o un misto di bietole e carciofi, poi cipolle, zucca, zucchine o zucchine trombetta, patate, funghi, ecc…. ma noi ci fermiamo alle prime due.

Per le note storiche vi rimando a un bellissimo post della Dani pubblicato ad aprile su Menuturistico


TORTA PASQUALINA DELLA MILIA
La Milia era la tata di mio papà che avrebbe 84 anni, quindi la ricetta ne ha 100 almeno almeno. Mio padre ne parlava con grande affetto e rispetto. Lei non sapeva leggere e scrivere quindi la ricetta è stata trascritta da mia nonna sul suo quaderno nero e a me è arrivata con una copia (sempre scritta a mano) che una zia aveva fatto per ogni sorella o fratello in modo che ognuno avesse la sua.

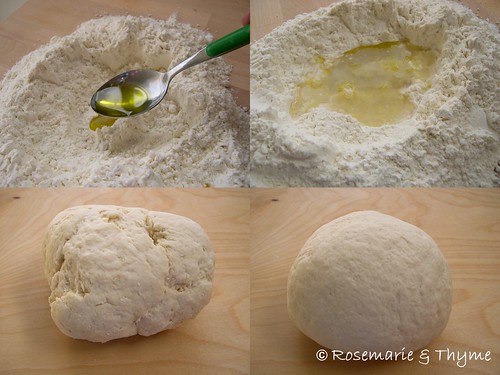
Pasta: Impastare 300 gr di farina “0” (meglio manitoba regge meglio quando si tira sottile) con sale, 30 gr di olio, ½ bicchiere di vino bianco secco e circa ½ bicchiere di acqua bastante per una pasta morbida (circa 150 gr di liquidi), ma non appiccicosa. Dividere in 5 palline e fare riposare coperta almeno 1 ora, meglio 2.

Pulite 1,2 kg di bietole, togliendo quasi tutta la parte del gambo, tagliatele a striscette e saltatele in padella con olio e.v.o. maggiorana e cipolla tritata. Deve asciugarsi bene l’umidità. Lasciare raffreddare. 
In una ciotola lavorate 250 gr di “prescinseua” genovese con 50 gr circa di parmigiano grattugiato, un pizzicone di maggiorana, sale e pepe. 
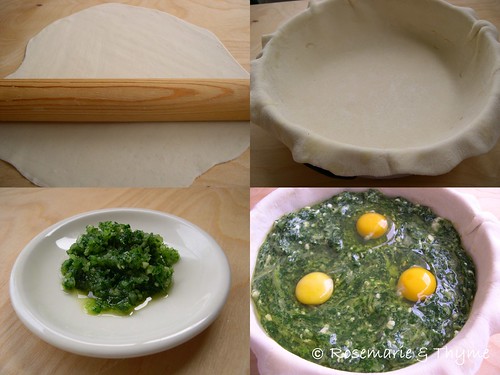
Stendete una pallina in una sfoglia sottile e foderate il fondo e le pareti di una teglia tonda (diametro 22-24) unta d’olio facendola un poco debordare (ungete anche il bordo della teglia altrimenti la pasta si strapperà quando dovrete arrotolarla) Ungete la pasta di olio con il pennello, stendete la seconda sfoglia. Versate dentro le bietole, sopra il composto di formaggio. 

Poi con il dorso di un cucchiaio fate 3 o 4 incavi a distanza regolare e in ognuno rompete un uovo; salate e pepate e versate un filino d’olio su ognuno. Le altre 3 sfoglie devono essere tirate sottilissime e non devono assolutamente avere buchi; io le tiro prima con il matterello e poi mi aiuto allargando la sfoglia con i pugni infarinati e ruotandola (non è facile farlo senza bucare la sfoglia).

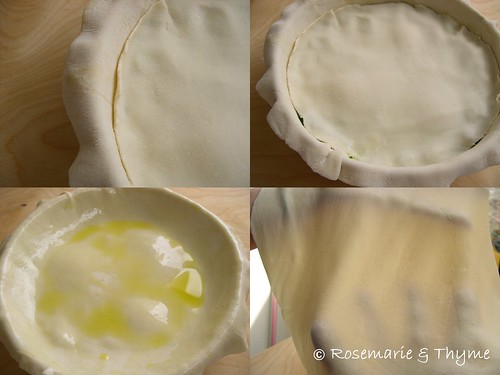
Tirare la prima delle tre sfoglie e coprire il ripieno facendo debordare la sfoglia di lato. Ungere bene la superficie con un pennello o con le dita delicatamente (sotto ci sono le uova intere!!!). Appoggiare la seconda sfoglia, ungere bene, appoggiare al bordo una cannuccia per soffiare aria fra uno strato e l’altro di pasta del coperchio, appoggiare l’ultima sfoglia e ungete anche questa molto bene. A questo punto arrotolare il bordo a cordoncino (se è troppo tagliarne una parte con le forbici). 
Se usate una cannuccia con il gomito non ci sarà rischio che qualche micro goccia di saliva arrivi alla torta, terrore di molti!!! Una volta si usava un maccherone lungo!
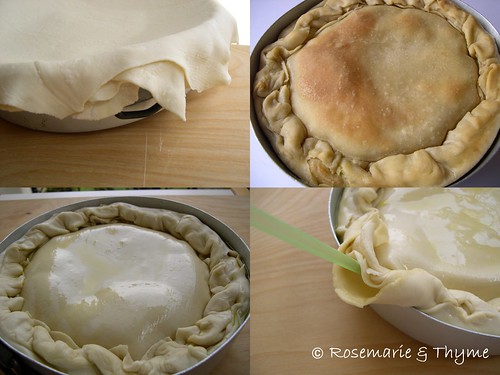
Quando è ben gonfia come un palloncino togliete rapidissime la cannuccia e sigillate l’apertura.
Infornare a 180° per 40-50 minuti o fino a doratura della pasta.
Appena tolta dal forno spennellate delicatissimamente di olio. Raffreddandosi la pasta si ammorbidirà e, se l’avrete fatta abbastanza sottile, scenderà come un velo!

TORTA PASQUALINA DI NONNA IBIDI
Stesse dosi per la pasta, la verdura e il formaggio (ricotta o prescinseua); per questa ho usato ricotta.
Una volta cotte le bietole, preparate l’impasto di ricotta, parmigiano, pepe, sale, maggiorana e aggiungete anche 2 uova battute. Tritate grossolanamente a coltello le bietole quando sono fredde e aggiungetele ai formaggi.

Ungete la teglia, tirate e sovrapponete le prime 2 sfoglie, versate il ripieno. Poi procedete come per l’altra torta: fate le fossette, sgusciate le uova, tirate le altre 3 sfoglie ungendo fra una e l’altra, chiudete il bordo a cordoncino, gonfiate la sfoglia a cupola, infornate."


Thursday, 27 September 2012

The Daring Bakers' September, 2012 Challenge: Empanada Gallega


DSCN0860 - Empanada gallega


EMPANADA GALLEGA

This was a really delicious "pizza imbottita" (stuffed pizza) as we would call it in Italy.  The filling I chose from the various recipes given was very quick to make and really tasty. I chose the first dough recipe and the tuna filling. The whole family really enjoyed it. They asked me to make it again and I am planning to make it for a birthday party coming up at work. :))
Just one or two things...for the amount of filling suggested, you can make less dough. Maybe a cup less. I only used 25 g of yeast - as in Italy yeast cubes come in that weight - and that was sufficient. So just take away one cup of flour  and proportionally lower the other ingredients. I used my Ken to do the work and I added about 2 tablespoons of lard as well as the tiny amount of olive oil suggested in the recipe. Make sure the lard is added in small amounts at the time once the dough is almost ready, as it will make the textute of the baked product better.

Patri of the blog, Asi Son Los Cosas, was our September 2012 Daring Bakers’ hostess and she decided to tempt us with one of her family’s favorite recipes for Empanadas! We were given two dough recipes to choose from and encouraged to fill our Empanadas as creatively as we wished!

And here is what she wrote for us:

Hi! My name is Patri from Asi Son Las Cosas, a DBer since 2009 (gee, how time flies!). When Lisa asked me to host this challenge, I made up my mind really quickly, because it is something I like to make, very versatile, and which would be a bit challenging when managing different flours. But first, let me tell you a little story
My grandparents lived in a country house that my great-grandfather built a hundred years ago. It is in the northwest of Spain, right on top of Portugal, in the region called Galicia. Back in the 70s, the kitchen was the place of gathering, talking, reading and there was always something cooking on the iron stove, be it a pot of caldo (a hearty soup), or a stew or a cake in the oven. When I think back to those days, I can smell the sweetness of burnt wood or coal, the almost chocolate scent that rose up to your nostrils when you opened the door, the warmth of the air when coming in from a cool, windy and wet August morning
When I was six, I loved adding wood to the kitchen, and seeing how the wood disappeared into a yellow-white flare. I also liked emptying the cinders from the deposit, sometimes making a mess of it, of course. I remember filling a pot with water to put in the stove after the cooking was finished and the fire went down, that warm water was used for washing the dishes or for cleaning up.
In that kitchen I used to step on my great-grandmother ‘s toes when I wanted to give her a kiss, because I was a bit clumsy. There, my uncle Pepe taught me to fry eggs and potatoes. And that ‘s where I learned to make empanada from my grandma Carmen, God bless her.
Empanada is the kind of food that makes one go back to childhood. A bread-like dough that surrounds a vegetable frittata with anything you can imagine, from sardines to beef. Or filled with sugar, butter and fruit. Warm or cold, it was simple, pretty, and delicious. I hope you will find it so too!

Recipe Source: The basic recipe I’ll be using is the one that my grandma used. However, I ‘m also including two more recipes:

Basic empanada recipe from La Empanada Gallega (in Spanish), which is quite fail-safe: http://empanadagallega.fiestras.com/servlet/ContentServer?pagename=R&c=Articulo&cid=981646204595&pubid=979757027793

Corn empanada dough recipe from the same on-line source http://empanadagallega.fiestras.com/servlet/ContentServer?pagename=R&c=Articulo&cid=983562415579&pubid=979757027793&PaginaActual=1


Note: As with all leavened doughs, rising times are approximate and depend on temperature. The warmer the temperature, the shorter the rise. You do not want to over-rise the dough or it will become too sour. But you don ‘t want the rise to be too short or you will not get a spongy bread.

Empanada is usually an appetizer or first course, but it is filling, so you could make for lunch or light dinner served with a side salad.

Mandatory Items: You must make an empanada using one of the given dough recipes. You have complete freedom for the filling, though I ‘m providing some ideas you can use or build from.

Variations allowed: Get creative! Use any shape, decoration or filling you want. I have never tried using other flours than wheat and corn, but if you have gluten allergies or intolerance you may try other flours that are used for gluten free bread. Adjust liquids accordingly.

Preparation time:
Making the dough: about 15 minutes (includes measuring the ingredients) + 50 minutes rise (will depend on ambient temperature)
Making the frittata: about 5-10 minutes for cutting the vegetables, 20 minutes for cooking + at least 30 min cooling time (I usually cut the vegetables and start frying them before mixing the dough, that way it has plenty of time to cool down while the dough rises ¡V bear in mind ambient temperature)
Getting the empanada together: about 15 minutes (time enough to warm the oven too)
Cooking the empanada: 40 - 50 minutes (may need more depending on filling, please read carefully).

Equipment required:
Dough
Big bowl
Small bowl
Wooden spoon
Your hands or
A stand mixer with dough hook
Rolling pin
Cookie sheet or oven tray
Pastry brush
Wax paper
Filling
Several sized bowls or plates (for the miss en place)
Pan or skillet
Wooden spoon

Empanada Gallega de bacalao con pasas
(my grandma’s empanada recipe with salted cod and raisins filling)
Servings: 10 - (makes a 40 cm x 30 cm square empanada or about a 35 cm diameter round empanada).
The filling may sound a bit strange at first, but that’s until you taste it J If you like salted cod, I’m pretty sure you will like it like this.
Dough Ingredients:
5-1/3 cups (1280 ml) (750 g) bread flour
 2 cups (480 ml) of lukewarm water about 85°F/30°C), approximately
1 satchel ( 1 tablespoon)( 15 g) dry yeast or 1oz/ 30 g fresh yeast
2 teaspoons (10 ml) (11 g) salt
4 tablespoons (60 ml) oil you can use from the pan where have cooked filling
1 large egg, for egg wash

Dough Directions:
1. Measure out all the ingredients.
2. Shift the flour into a big bowl and make a well in the middle. Rub the yeast in with your fingers.
3. In a small bowl, mix the water and the salt.
4. Now, using your fingers or a wooden spoon, start adding the water and mixing it with the flour-yeast mixture. Keep on working with your fingers or spoon until you have added enough water and all the flour has been incorporated and you have a messy ball of dough.
5. On a clean counter top, knead the dough for approximately 10 minutes
6. You could do all the above using a stand mixer, in that case mix the ingredients with the paddle attachment until mixed and then switch to a dough hook and knead on low for about 6 minutes.
7. Clean and oil the big bowl you used for mixing and place the kneaded dough in it. Cover it with a napkin or piece of linen and keep it in a warm, draught-free place for approximately 40 to 50 minutes.
8. Once risen, turn the dough back into a floured counter and cut it in half. Cover one half with the napkin to prevent drying.
9. Spread the other half of the dough using a rolling pin. You can use a piece of wax paper over the counter, it will make it easier to move the dough around. Depending on the shape of your oven pan or cookie sheet, you will make a rectangle or a round.
10. Now, the thinness of the dough will depend on your choice of filling and how much bread you like in every bite. For your first time, make it about 3mm thin (about 1/10th of an inch) and then adjust from that in the next ones you make.
Filling Ingredients
400 gm (14 oz) chopped onion approximately 1 big onion or 2 medium sized ones)
2 garlic cloves
3/4 cup (180 ml) Olive oil
300 gm (10. oz) salted cod, washed and cleaned you put it in fresh water 24 hours before, change the water four times
100 gm (3. oz) raisins
100 gm (3. oz) cured ham or bacon (not smoked)
A few strands of saffron

Filling Directions:
1. Finely chop the onion and garlic.
2. Heat the oil in a skillet and add the onion and garlic, fry over medium heat until the onion is transparent (you do not want the onion to brown at all).
3. When vegetables are cooked, turn off the heat. Add the saffron and the raisins. Cut cod and ham (or bacon) in less than bite sized pieces, and add. Stir everything together.
4. Add salt as needed (we do this at the end because the amount of salt will depend on how salty your fish remains after the unsalting and how salty your cured ham or bacon is).
5. Allow to cool for at least half an hour before filling the empanada.

Assembling the empanada:
1. If you haven’t used wax paper, either lightly flour or line with wax paper your pan or tray.
2. Cover the base and sides with the dough. Using the rolling pin or a knife, cut the extra dough.
3. Place the filling, making sure it is cold and that all the base is covered. Using a hot filling will make the bottom layer of the empanada become soggy. Be careful to avoid adding too much oil from the filling, try to make it as dry as possible.
4. Start preheating your oven to moderate 350°F/180°C/gas mark 4.
5. Take the other half of the dough and spread it out to the same or less thinness of the base. You can use a piece of wax paper for this too. Take into account that this “top” dough needs to be smaller around than the bottom, as it only needs to cover the filling.
6. If not using wax paper, move carefully the top to cover the filling. If using wax paper, transfer the dough, turn upside down, cover the filling and gently peel off the wax paper.
7. Using your fingers, join bottom and top dough, when you have gone all the way around, start pinching top and bottom together with your thumb and index finger and turning them half way in, that way you end up with a rope-like border. As a picture is worth a thousand words, please watch this video to see how it is done: http://youtu.be/CNpB7HkTdDk
8. When you are finished, make a 1 inch hole in the middle of the top layer. This will help hot air exit the empanada while it’s baking without breaking the cover.
9. You can use left-over dough to decorate the empanada, using rounds, bows, lines…let your imagination flow and make it pretty!
10. Using a fork, prick the top layer or, using scissors, make snips that go all the way through the layers.
11. In a small bowl, beat an egg and add a tbsp of cold water. With the pastry brush, paint the top of the empanada with the egg wash.
12. Place the empanada in the oven and bake for about 45 minutes. Check that the bottom part is done.

Empanada Dough
(a recipe using wheat flour from “La Empanada Gallega
Servings: 6
Ingredients:
3½. cups (500 g) all-purpose (plain) or bread flour
1 cup (240 ml) warm water
½ cup less 1 tablespoon (100 ml) of liquid fat (oil, margarine, lard)
1 satchel (1 tablespoon) (15 g ) dry yeast or (1oz) (30g) fresh yeast
1 teaspoon (5 ml) (6 g) salt
1 teaspoon (3 g) sweet paprika

Directions:
1. Shift the flour into a bowl, make a well in the middle and add all the ingredients (you should break the fresh yeast as much as possible).
2. Mix with a wooden spoon until all the ingredients have been incorporated
3. Turn dough onto your counter and knead for 8 minutes
4. Make a ball and allow to rise covered with a cloth for about half an hour before using.
The rest of the steps are the same as with the first recipe.
You can also use in this case the stand mixer, reduce kneading time to 5 minutes.

Corn and Wheat Empanada Dough
(from “La Empanada Gallega”¨)
Ingredients:
2 ¾ cups (14 oz) (400 g) corn flour not corn starch!)
¾ cup (3½ oz) 100 g) all-purpose (plain) flour
1 cup (250 ml) warm water
 2 teaspoons (10 g) (1/3 oz) active dry yeast or (4/5 oz) (25 g) fresh yeast
1 teaspoon (5 ml) (6 g) salt
 2/3 cup (150 g) lard, butter or margarine


Directions:
1. Mix well flours in a large bowl. Make a well in the middle and add the water, the fat (softened) and the yeast (if using fresh, use your hands to break it up as much as possible)
2. Use a wooden spoon to mix the ingredients and then turn the dough onto the counter and start kneading until you have a soft dough that doesn’t stick to your hands.
3. Add more water or flour if needed.
4. Make a ball with the dough, cover it with a cloth and allow to rise for approximately 1 hour.
5. This dough is very difficult to spread, so you will probably have to use your hands and some patience.
6. Go for a very thin covering, if it is too thick it will take longer to cook and it will have some “chew”, making it unpleasant to eat.
7. Oil the pan or oven tray you will be using before spreading the dough on it.
8. Use wax paper or even foil to cover the surface where you will be spreading the dough.
9. Put the dough on top and powder freely with flour. Using the rolling pin, spread it as much as possible.
10. With the help of the paper or foil, transfer the dough to your pan or tray.
11. Fill the empanada
12. Now you can try spreading the other half of the dough the same way as the bottom part or try using your hands, taking pieces of dough, spreading them as thin as possible using your hands and then joining them to the rest of the cover using your fingers.
13. Using a fork, make lines in the top layer marking the portions. This will help you when serving the dough, as the top will break easily along this lines without making a mess.
This empanada dough goes very well with blue fish or seafood fillings.

Other possible fillings:
Tuna fish filling:
Ingredients
400 gm (14 oz) chopped onion (approximately 1 big or 2 medium sized ones)
200 gm (7 oz) tomatoes (peeled and seeded)
1 small red pepper
2 garlic cloves
¾ cup (180 ml) olive oil
1 can (6.5 - 7 oz / 180 g - 200 g) of tuna fish in oil, drained
1 hard-boiled egg
1 teaspoon sweet paprika (optional)

Directions:
1. Heat the oil in a skillet
2. Fry the finely chopped onions, pepper and garlic until the vegetables are soft. Add then the tomatoes, chopped small, and cook until done.
3. Turn off heat and add the tuna fish and hard boiled egg, cut into less than bite sized pieces.
4. If adding the paprika, do so now and stir into the frittata.
5. Allow to cool for at least 30 minutes.


Ground (minced) meat filling:
Ingredients
400 g (14 oz) chopped onion approximately 1 big or 2 approximately 1 big or 2 medium sized ones
200 g (7 oz) tomatoes (peeled and seeded)
1 small green pepper
2 garlic cloves
¾ cup (180 ml) olive oil
300 grams (2/3 pound or 10.5 ounces) minced (ground) meat
1 teaspoon sweet paprika

Directions:
1. Heat the oil in a skillet
2. Fry the finely chopped onions, pepper and garlic until the vegetables are soft. Add then the tomatoes, chopped small, and cook until done.
3. Add the meat and cook for about 5 minutes.
4. Add the paprika, and stir into the frittata.
5. Allow to cool for at least 30 minutes.
6. Fill the empanada and bake as indicated.

Ham and cheese filling:
Ingredients
10½. oz (300 g) ham
10½. oz (300 g) cheddar type cheese (any sandwich cheese will do)

Directions:
1. This is the simplest of fillings. You only need to layer prettily the ingredients, starting and ending with ham, to keep the melted cheese inside.

Pork loin and red pepper filling:
Ingredients
10½ oz (300 g) pork loin one piece)
1 big red pepper (capsicum), cut into thin slices,
1 small onion, cut into thin slices
2 garlic cloves
1 tablespoon (15 ml) (6g)  paprika
½ tablespoon (3 ml) dried oregano
salt
Directions:
1. 24 hours in advance, marinate the pork loin: for this, mix the oregano, paprika and the garlic cloves (very finely chopped) with salt to taste. Rub this marinade all around the meat, put into a sealable plastic bag and keep in the fridge for 24 hours.
2. Take the meat out of the bag and cut into thin fillets (about 0,5mm)
3. Cover the bottom part of the empanada with the fillets.
4. Cover the fillets with the slices of onion and pepper. Sprinkle salt on top.
5. Cover the empanada and bake in a preheated oven to moderate 350°F/180°C/gas mark 4. As this empanada starts with all raw ingredients, it will take about 15 minutes longer to bake. Just check that the underside of the empanada is golden. If it is, it ‘s cooked. If it isn’t, put it in the oven again and check after 10 minutes.
Get creative!!
As you have seen, the basic filling is made with an onion and garlic frittata, adding either saffron (for white fish) or paprika (for blue fish or meat) and adding tomato and pepper if you feel like it . You can also make the empanada with raw ingredients, it will taste as good though cooking times increase. Once the outside of the empanada is cooked, whatever is inside will also be cooked! I’ve tried empanada with mussels, fresh sardines (gutted and boned), scallops, chicken, pork meat, ground meat, vegetarian (just put in there whatever you have in hand), eggs… the variations are endless!
Even sweet fillings can be made. Apples make a wonderful option, for instance, in those cases I would add some milk, cream, a little sugar or honey and even spices to the empanada dough and fill with sugar, cored and sliced apples, some raisins, some more sugar and to the oven!.
Play around with the recipe and make it your own .
I made this empanada for my brother in law David’s birthday in August. I’ve also made some other empanadas for taking to picnics, these I made with thicker layers of dough, and decorated them in a more country-like way.
Storage & Freezing Instructions/Tips: Empanadas are better eaten the day of baking, but will stay fresh for a day more if stored in a cool place (for instance, in a cold oven or in a cupboard) uncovered or covered with foil. You may use plastic wrap but the dough will become a little gummy. If the filling is fish or sea-food, and the weather is hot, you might stick the completely cooled left overs in the fridge, though the dough will become gummy. You can always re-heat it in a hot oven for about 5 minutes.
Disclaimer:
The Daring Kitchen and its members in no way suggest we are medical professionals and therefore are NOT responsible for any error in reporting of ¡§alternate baking/cooking¡¨. If you have issues with digesting gluten, then it is YOUR responsibility to research the ingredient before using it. If you have allergies, it is YOUR responsibility to make sure any ingredient in a recipe will not adversely affect you. If you are lactose intolerant, it is YOUR responsibility to make sure any ingredient in a recipe will not adversely affect you. If you are vegetarian or vegan, it is YOUR responsibility to make sure any ingredient in a recipe will not adversely affect you. The responsibility is YOURS regardless of what health issue you ‘re dealing with. Please consult your physician with any questions before using an ingredient you are not familiar with. Thank you! :)

Saturday, 28 July 2012

Gelato allo zabaione con cialda casalinga


DSCN0412 - blog_gelato allo zabaione


Quando ho visto che Mapi aveva deciso di farci preparate il gelato per la sfida di luglio dell'MTC non ho avuto dubbi. Il gusto sarebbe stato lo zabaione, il preferito del webmaster. Infatti solo qualche giorno prima avevamo tirato fuori la gelatiera per sperimentare in casa la riuscita di questo gelato. Il webmaster aveva scelto la ricetta dello zio Piero che qui sotto vi riporto.
Inutile negare che i gelati con il liquore negli ingredienti non presentino il problema di un rapido scioglimento rispetto agli altri gusti, ma per quanto riguarda lo zabaione, questo draw-back è ampiamente ripagato dalla bontà del gelato.
All'insegna della semplicità, per non coprire il gusto dello zabaione, ho deciso che la salsa di accompagnamento sarebbe stata una ganache al cioccolato fondente. Per le cialde ho usato la ricetta passata su CI regalataci da Rino che riporto più in basso e che ho scelto perché prevede l'uso dell'acqua invece che del latte.

GELATO ALLO ZABAIONE

Ingredienti per quattro persone

4 tuorli
140 g zucchero
40 g glucosio (fa la differenza, parola di Adriano)
20 g miele (anche questo fa la differenza ;-) )
20 g farina (sempre su consiglio del Maestro)
150 g panna
250 g di latte
stecca di vaniglia
175 g di marsala

Scaldate il latte con i semi di vaniglia, il glucosio e il miele fin quasi all’ebollizione.
Fate una crema con tuorli, zucchero, farina e il latte di prima. Fate intiepidire e poi diluite con il marsala. Alla fine aggiungete la panna e far amalgamare per bene. Mettete tutto in frigo per almeno 12 ore e per non più di 24.
Versate il composto nella ciotola della gelatiera e avviate.
Togliete quando il composto sarà diventato della giusta cremosità.

Appena fatto è strepitoso; potete tenerlo 15 minuti nel freezer sarà ancor più buono.

Nel freezer si conserva (se ci riuscite!!!) bello cremoso, merito del glucosio e del miele. In ogni caso , se siete proprio esigentissimi, prima di consumarlo potete aspettare qualche minuto o rimantecarlo per bene.


cialdiera


Per le cialde ho avuto un aiutante di eccezione, un giovane volontario soprannominato mani di amianto,  che ha tagliato a mani nude le cialde appena fatte in quarti.


130  g di zucchero
135 g di farina
70  g di burro
140 ml di acqua
1  uovo
sale
cannella

Sbattete l'uovo in una ciotola con lo zucchero, un pizzico di sale, un pizzico di cannella ( a chi piace) aggiungetevi l'acqua dove avrete precedentemente fatto sciogliere il burro.

Mettete poi la farina e mischiate in modo che il composto non faccia grumi, deve essere abbastanza fluido  in modo da disperdersi bene, versate una certa quantità di impasto sul ferro che avrete precedentemente portato a temperatura, la quantità dipende da quanto è grosso il ferro, da quanto è grosso il mestolo...io sono andato per tentativi.
Vi consiglio l'uso di un timer, in questo modo la prima volta che li fate potete correggere bene il tempo e la temperatura , comunque, trascorso  un minuto potete controllare la cottura a vista, aprendo lo sportello.

GANACHE AL CIOCCOLATO FONDENTE

50 g di cioccolato fondente
50 g di panna liquida


scaldare la panna senza farla bollire, togliere dal fuoco e far sciogliere il cioccolato lavorando molto delicatamente con una forchetta. La panna non deve montare ed il cioccolato deve rimanere lucido.


con questo post partecipo all'MTC di luglio 2012


Saturday, 30 June 2012

Scaloppine al limone profumate al timo limone


DSCN0249 - Scaloppine al limone1  


Chi ha tempo non aspetti tempo diceva mio nonno. E aveva ragione. Lui apparteneva ad una generazione che aveva ancora la sensazione di avere tempo libero o essere occupati. Ma io no. 

Io ho sempre la sensazione di non avere tempo, perciò metto da parte tante cose da fare, in ordine di priorità, sperando di arrivare a far tutto prima o poi. E così, questo mese, ho fatto "en plain". Sono riuscita a saltare le dead line sia dell'MTC che di Daring Bakers.

Un mese pieno, questo, con gli impegni che poi tutti abbiamo, niente eventi micidiali, ma lavoro; geriatrico che patisce particolarmente il caldo; veterinario x due quattrozampe - mica in una volta sola, in più appuntamenti separati per ogni bestiola eh,eh; marito in panne con lo studio, che fai prima a studiare tu che a spronarlo, rincuorarlo, e anche strapazzarlo, e che continua a spostare l'esame di volta in volta. Argh!!!!!; un tris di compleanni uno dietro l'altro, per i quali sono riuscita a fare una sola torta, ho impunemente dato priorità alla mia, visto che festeggiavo i miei primi 50 anni con le mie amiche. Il dolce per Daring Bakers aveva succhiato le ultime energie e non poteva ancora essere finito per imprevedibile irreperibilità momentania di ingredienti! Grrr! Quando ormai stremata dal caldo, ho capitolato di fronte all'evidenza che non sarei riuscita a "sfornare" un'altro dolce sciuè sciuè la cena del 28, appunto, per il compleanno-tris ho dovuto accontentarmi di una torta acquistata. E sì che mamma webmaster mi ha fatto anche i complimenti, che la torta era proprio buona, ed avrei potuto a quel punto spacciarla per mia, ed invece ho immediatamente chiarito. No no, l'ho comprata. Sob. :))

E poi c'è stato l'acquisto del parmigiano reggiano, che è vero non sono andata io a ritirare a piedi fino in Emilia, ma comunque un minimo di organizzazione per il mio gruppo c'è voluta. E del reperimento fuori stagione di libri di testo per esami integrativi per blue eyes in arrivo, ne vogliamo parlare? La la creazione a punto peyote della fascia che ho regalato alla nostra colf? Che sbadata, non l'avevo messa in elenco. Ah, sì l'apertura della casa al mare con mocio e secchio in mano, conta anche quella? Quanti punti vinco? 
E la progettazione e inizio di piantagione di un orto quasi-sinergico con i colleghi, quella me la stavo dimenticando. Ed è in aggiunta a quello microcasalingo.
Tornata a casa, stanca ma felice, ho realizzato. Laa cena era fissata per  il 28, - quel 28 del mese, quello che sempre delimita un Challange dall'altro - ed è mezza notte meno un quarto ergo non ho preparato le scaloppine per tempo. Bene! grrr. Non dovrò più chiedere al consorte di comprare della vitella ogni giorno come nell'ultima settimana senza ottenerla. Eh,sì, sono anche stata sabotata da colui che la mattina ci tiene ad andare al mercato per carne e frutta mentre io non posso. E sì che oggi se le è sbafate.
Mentre ammiro immensamente le maghe del mega party sento che sto decisamente perdendo colpi. Tre di ogni portata al momento mi farebbe venire un colpo solo a progettarlo. Ed infatti ho la bloggite "ma anche" il cucinablues.


Nonno, ma tu ce le avevi così tante cose da fare? 

Certo, se leggo in positivo quanto ho elencato, posso dire che per ora ho ancora un lavoro.  La famiglia è in aumento, visto che oltre il nuovo quattrozampe, il bipede è in arrivo fra poco per studiare qui a Roma. Se il geriatrico patisce l'afa , vuol dire che ancora c'è,  vado verso i prossimi 50 anni, ho una mammawebmaster con cui vado d'accordo, ci vogliamo bene e ci stimiamo. Ancora una torta ogni tanto nell'afa più totale riesco a "sfornarla" e soprattutto so con chi dividerla.


DSCN0242 - Scaloppine al limone2


Inutile dire che ho eseguito pedissequamente la ricetta di Elisa, perchè  anche io ho scoperto di non aver mai veramente cucinato una scaloppina da manuale. Mi è sempre mancata l'aggiunta del fondo di cucina. Ora sì che ho ottenuto un bel sughetto di quantità giuste per accompagnare la carne. E anche questa volta ribadisco che la mia esperienza di blogger  e di condomina CI è nel segno del continuo imparare  sia dagli altri che dai libri, ma che senza gli altri, il confronto con gli altri, si impara sempre di meno. E quindi, a parte la fretta, ho voluto iniziare proprio con l'original, la base delle basi. E visto quanto ho detto prima, credo che il webmaster non si "dimenticherà"  più la carne per le scalopine. Eh,eh.
Ah, dimenticavo, il timo limone è sempre sul mio balcone ;) Mica sono una Rosemarie senza Thyme


SCALOPPINE DI VITELLO AL LIMONE PROFUMATE AL TIMO LIMONE


Uno degli aspetti caratterizzanti di questa preparazione, insieme alla pezzatura della carne, è senz'altro il fondo di cottura, che bisogna curare e coccolare, per ottenere una scaloppina con una salsa degna di nota, perché i fondi e le salse in cucina sono di fondamentale importanza e il risultato finale di molte ricette dipende spesso dalla loro qualità. Ma cosa significa coccolare? Semplicemente che dopo aver infarinato e rosolato la carne, bisogna metterla da parte e dedicarsi alla salsa, come potrete leggere nella ricetta qui sotto.
Prima di cominciare, solo due parole per spiegare alcuni termini che userò: quando parlerò di fondo di cottura mi riferirò a ciò che rimane dopo la cottura di una vivanda; per fondo di cucina invece si intendono tutte quelle preparazioni di base che servono per impostare le lavorazioni (fondi bruni e bianchi, fumetto di pesce, glace, brodi, consommé, gelatine, roux, court-bouilllon, marinate, salamoie, ecc.), nel caso specifico delle scaloppine i fondi di cucina che ci interessano sono perlopiù i brodi vegetali, di carne e di pesce. Infine con la parola deglassare, si indica il procedimento attraverso cui si bagna con vino o un altro liquido per far fondere il succo lasciato da una vivanda.


Ingredienti per due persone

2 fette di vitella  da 100 g l'una
burro q.b. (l'ideale sarebbe il burro chiarificato, ma non è necessario)
3-4 cucchiai di farina
1 limone non trattato (il succo e la scorza)
2 zucchine chiare
1 spicchio d'aglio
qualche rametto di timo limone
olio evo q.b.
sale q.b.
pepe nero q.b.
1 dl di brodo di pollo

Procedimento
Mondare e lavare le zucchine, tagliarle a listarelle e rosolarle in padella con uno spicchio d'aglio in camicia, un filo d'olio evo e qualche rametto di timo limone. Aggiustare di sale e tenere da parte.
Battere le fette di pollo: è importante che siano sottili, quindi se non avete un batticarne, chiedete al macellaio di farlo per voi. Esiste un piccolo accorgimento per battere la carne senza sfibrarla: basta semplicemente adagiare la fettina tra due fogli di pellicola ed impugnare molto bene il batticarne (alla base) per dare colpi dritti e decisi.
Tagliare le fette di pollo a metà: solitamente si contano due scaloppine a testa, ognuna da 40-50 g. Mescolare la farina con la scorza di limone grattugiata e, con questo composto, infarinare la carne; in una padella (possibilmente non anti-aderente) far scaldare un pezzo di burro e rosolare le scaloppine a fuoco vivace da entrambi i lati. Salare solo dopo la rosolatura, perché il sale tende a disidratare la carne e si rischia di ottenere fettine asciutte e dure: se si attende invece che i pori della carne siano ben sigillati grazie al calore, i succhi rimarrano in gran parte all'interno (o meglio, verranno rilasciati solo quelli necessari a creare il fondo di cottura). Insaporire le scaloppine con un pizzico di pepe e sistemarle su un piatto da tenere da parte.
A questo punto dedicarsi alla salsa: deglassare il fondo di cottura con il succo di limone, lasciare evaporare leggermente e unire il fondo di cucina (in questo caso brodo di pollo); far bollire per qualche minuto, in modo da restringere la salsa, dopodiché aggiungere una noce di burro e ruotare la padella per emulsionare. Filtrare la salsa con un colino e versarla sulle scaloppine, che avremo rimesso in padella a insaporire insieme al contorno. Eventualmente si può tenere un po' di salsa da parte per poi versarla direttamente nel piatto al momento di servire.
p.s. quella che vedete nel bicchierino della seconda foto è proprio la salsa tenuta da parte: tanto per darvi l'idea di come dovrebbe risultare ;) 


Con questo post partecipo fuori concorso all'MTC di giugno

Wednesday, 27 June 2012

Battenberg Cake for Daring Bakers on a special date

Daring Bakers' Challange reveal date is on  my birthday .

DSCN0300_battenberg cake_slice
traditional Battenberg cake


Battenberg cake collage


I was really intrigued by the Battenberg Cake. Another new recipe for me and a bit of royal family history to read about. First of all I discovered that the Battenbergs are none other than the side of the family we now know as Mountbatten.

It is said that the cake was made for the marriage of one of Queen Victoria's grandchildren Princess Victoria of Hesse and by Rhine to her father's first cousin, Prince Louis of Battenberg, an officer in the United Kingdom's Royal Navy.


Victoria of Hesse and by Rhine,  was the daughter of  Princess Alice of the United Kingdom of Great Britain and Ireland herself one of the daughters of Queen Victoria and Prince Albert.


even more beautiful in her old age

I kept asking myself what the original wedding cake must have looked like. I am still wondering if it was a four squares affair or something larger, seeing it was a wedding cake. Somewhere I read it was probably made of nine squares.

But there is some also some interesting evidence against the Wedding Cake theory that you can read :


DSCN0295_2Battenberg cake


TRADITIONAL BATTENBERG: Servings: +- 8
Daring Bakers recipe from Mandy

Ingredients

 ¾ cup (1½ sticks) 175 g / 6 oz Unsalted Butter, softened & cut in cubes
¾ cup / 175 g / 6 oz Caster Sugar 
1¼ cups / 175 g / 6 oz Self-Raising Flour (***see end of doc on how to make your own)
3 Large Eggs, room temp
½ cup / 65 g/ 2 1/3 oz Ground Almonds (Can be substituted with ground rice)
3/4 tsp / 3½ g Baking Powder
½ tsp / 2½ ml Vanilla Extract 
1/4 tsp (1¼ ml) Almond Extract
Red Food Colouring, paste, liquid or gel To Finish
1/3 cup (80 ml) 100 g /3 ½ oz Apricot Jam
1 cup / 225g / 8 oz Marzipan, natural or yellow

The Marzipan Recipe I used

200 g of almond flour
100 g of plain icing sugar
100 g of vanilla flavoured icing sugar
30 g of flour
2 egg whites

Combine dry ingredients (no exessive blending - it would heat the almond flour and that is no good) in a food processor then add the egg whites. Do not overwork the marzipan. Place in a sealed container in the refrigerator for a few hours. If you make it one day for the next it is even better.


Of the Battemberg cakes made differently from the original recipe, I really liked this one make by Korena of Korena in the Kitchen. I just have to show you how beautiful it is, then you will certainly visit her blog for the recipe.


And here are the original notes given by By this month's host Mandy

Hello Daring Bakers! It’s Mandy of What the Fruitcake?! and I am so excited about this month’s challenge. It’s not over- complicated, uses simple ingredients, doesn’t take an age to do, but, I think it’s a classic that has a certain whimsical quality, and something that I think we’ll be able to have a lot of fun with. There’s definitely room for creativity here! What are we doing? Battenberg Cake! Funny enough, before making this cake for the challenge, I hadn’t eaten a single crumb of a Battenberg. But whenever one caught my eye in the store, I couldn't help but look at it with a smile. There’s something about the checkered squares in yellow and pink that makes me think of tea with Alice at the Madhatter’s, or a little girl serving out slices to her teddy bears on little plastic plates. This cake has far grander beginnings than tea with teddy. It was actually created as a wedding cake for royalty. The first Battenberg cake was made to celebrate the marriage of Queen Victoria’s granddaughter, Princess Victoria, to husband Prince Louis of Battenberg. It’s traditionally flavoured with almond and has the signature Battenberg markings, that is, the yellow and pink squares (said to represent the four princes of Battenberg). The strips of sponge are glued together using jam (normally apricot) and the whole cake is covered in marzipan. Sometimes the edges are crimped and the top is patterned with a knife. Being that this recipe is thoroughly English, I thought it would be appropriate to use a recipe from a fantastic English baker, Mary Berry. (Don’t you just love her name?). This traditional Battenberg recipe comes from Mary Berry’s “Baking Bible”. It’s an all in one cake method, so very simple, quick and very few dirty dishes! Although there are specialised Battenberg cake tins available, you don’t need one. This can be baked in a square baking tin and a divide made with foil to separate the two batters. This recipe really is all about simplicity. Your challenge, fantastic DBers, is to make a Battenberg cake. It must be in the traditional shape (square oblong) and must have at least two different coloured checks as well as be covered in a firm edible covering like marzipan. But, you can choose any flavours you like, and if you want, even do more than two colours (look at the end of this post for a link to a fun Rubiks Cube Battenberg).

I would encourage you to use marzipan, but I know many people don’t like marzipan at all, so you can also use rolled fondant or chocolate plastique to cover your cake. You can also use buttercreams, curd, ganache etc instead of jam to glue the cake together. I’ve also included another of Mary Berry’s Battenberg recipes, a coffee and walnut Battenberg, held together with coffee buttercream. Other popular flavours are lemon and orange sponges glued with lemon curd and also coconut sponge with raspberry jam. I hope your creative ideas get flowing 'cause the flavour sky is the limit, go wild! Something I love about this treat is that it makes quite a small cake, but that’s a good thing! It means you could make two or three, which means you can play with more flavours! One last thing before the nitty gritty, here’s a fantastic video with Mary Berry herself from an episode of The Great British Bake Off demonstrating her walnut and coffee Battenberg. It shows the assembly really well so is worth watching. Battenberg up! 

Recipe Source:

Traditional Battenberg adapted from Mary Berry’s “Baking Bible”
Coffee and Walnut Battenberg is also from Mary Berry on the BBC Food website

Blog-checking lines: Mandy of What The Fruitcake?! came to our rescue last minute to present us with the Battenberg Cake challenge! She highlighted Mary Berry’s techniques and recipes to allow us to create this unique little cake with ease. Posting Date: June 27, 2012


A few tips when working with marzipan/fondant/chocolate plastique in humid and hot weather. Firstly, keep it cool. It does need to be pliable, but it won't hurt to chill it just slightly to help keep your covering from "melting" and becoming too sticky to work with. You do need to knead it to get it ready for rolling and covering but try to handle it as little as possible as soon as it's pliable enough, and if you need to, roll out the marzipan in between sheets of parchment paper and use plenty of corn flour or powdered sugar on your rolling pin, hands, surface etc.

 I've adapted Mary Berry's recipes quite a bit in terms of quantities 'cause I found the amount of batter to be too little for an 8"x8" (20cmx20cm) cake pan, once the sponges were trimmed the strips were a bit on the slim side. The amounts provided are perfect for an 8"x8" (20cmx20cm) tin. However, if you do have a Battenberg pan (8"x6") (20cmx15cm) then you will have some leftover batter. Just fill your Battenberg tin to 3/4 full and that should be enough for the batter to rise above the top of the pan which you can then trim off. The batter is your basic sponge recipe, equal amounts of butter, sugar and flour (in weight) and it's not a fussy recipe at all. Although a lot of Battenberg recipes first cream the butter and sugar, Mary Berry swears she gets a better Battenberg sponge by using the all in one method, and I must say, my sponges came out great using the all in one method. But you're welcome to use the creaming method if you like. And if you do use the all in one method, just make sure you don't over mix the batter, once it's all combined, it's done (hard for a chronic over mixer like me!). I didn't even bother using my stand mixer, I used my hand electric mixer, and I think you could quite easily even use a wooden spoon for some old school baking If you want to add a flavour to one of the sponges in liquid form, make sure to add the same amount of liquid to the other batter in the form of milk. The batter is very thick and should be quite thick so don't add too much. You'll see an example of this in the Coffee & Walnut Battenberg. I've included links at the end of the post for home made marzipan as well as recipes for chocolate plastique/modelling chocolate. Also at the end of the post is how to make your own self raising flour. And for those who want to substitute the ground almonds in the batter for something else, Mary Berry recommends substituting with ground rice. It needs to be a similar texture to ground almonds so don't use rice flour. You can make your own ground rice in a food processor or coffee grinder.

Mandatory Items:
- You must make your Battenberg in the traditional square & oblong shape
- You must have at least two different coloured sponges
- You must have the traditional Battenberg Markings, ie a checked pattern
- Your Battenberg must be covered in a firm edible covering ie. Marzipan, fondant or chocolate plastique 

Variations allowed:
- You can use any flavours you like
- You can have more than two coloured sponges
- You can have more than four squares making up the Battenberg markings (the checked pattern)
- You can colour the covering (marzipan, fondant or chocolate plastique)
- You can use ganache, frosting, curds etc as the "glue" for the sponges instead of jam Preparation time: 

Preparation: 15-20mins Baking & Cooling Time: 45-60mins

Assembly: 15-20mins

Equipment required:
Medium Large Mixing Bowl
Medium Small Bowl (for buttercream)
Small Heatproof Bowl (for jam)
Spatula/Spoonula
 Wooden Spoon OR Electric Handmixer OR Stand Mixer
 Large Sieve Small Sieve (for jam)
 Pastry Brush (for jam)
Small Palette Knife OR Spatula OR Blunt Knife (for buttercreams etc)
 8"x8" (20cmx20cm) Square Baking Tin OR 8"x6" (20cmx15cm) Battenberg Tin
 Bread Knife OR Pastry Knife
 Rolling Pin
 Sharp Knife
 Whisk

Traditional Battenberg: Servings: +- 8

Ingredients

 ¾ cup (1½ sticks) 175 g / 6 oz Unsalted Butter, softened & cut in cubes
¾ cup / 175 g / 6 oz Caster Sugar 
1¼ cups / 175 g / 6 oz Self-Raising Flour (***see end of doc on how to make your own)
3 Large Eggs, room temp
½ cup / 65 g/ 2 1/3 oz Ground Almonds (Can be substituted with ground rice)
3/4 tsp / 3½ g Baking Powder
½ tsp / 2½ ml Vanilla Extract 
1/4 tsp (1¼ ml) Almond Extract
Red Food Colouring, paste, liquid or gel To Finish
1/3 cup (80 ml) 100 g /3 ½ oz Apricot Jam
1 cup / 225 g / 8 oz Marzipan, natural or yellow

Directions:
 1. Preheat oven to moderate 350°F/180°C/160°C Fan Assisted/Gas Mark 4
 2. Grease an 8”/20cm square baking tin with butter
 3. Line the tin with parchment paper, creating a divide in the middle with the parchment (or foil) - Tip: See photos or watch video above for detailed instructions
 4. OR Prepare Battenberg tin by brushing the tin with melted butter and flouring
 5. Whisk together the dry ingredients then combine with the wet ingredients in a large bowl and beat together just until the ingredients are combined and the batter is smooth
 6. Spoon half the mixture into the one side of the prepared baking tin
 7. Add a few drops of red food liquid/gel/paste to the remaining batter, stir until the colour is thoroughly distributed, add more colour if needed
 8. Spoon the pink batter into the other half of the prepared baking tin
 9. Smooth the surface of the batter with a spatula, making sure batter is in each corner
 10. Bake for 25-30mins until the cake is well risen, springs back when lightly touched and a toothpick comes out clean (it should shrink away from the sides of the pan)
11. Leave to cool in the tin for a few minutes before turning out to cool thoroughly on a wire rack
12. Once completely cool, trim the edges of the cake with a long serrated knife
13. Cut each coloured sponge in half lengthways so that you are left with four long strips of sponge
14. Neaten the strips and trim as necessary so that your checkered pattern is as neat and even as possible 15. Gently heat the apricot jam and pass through a small sieve yellow next to one pink. On top of that, one pink next to one yellow) - Tip: See photos for detailed instructions

16. Brush warmed jam onto the strips of cake to stick the cake together in a checkered pattern (one yellow next to one pink. On top of that, one pink next to one yellow) - Tip: See photos for detailed instructions

17. Dust a large flat surface with icing sugar then roll the marzipan in an oblong shape that is wide enough to cover the length of the cake and long enough to completely wrap the cake
18. Brush the top of the cake with apricot jam
19. Place the cake on the marzipan, jam side down - Tip: Either in the middle or to the one side of the marzipan
 20. Brush the remaining three sides with jam
 21. Press the marzipan around the cake, making sure the join is either neatly in the one corner, or will be underneath the cake once turned over - Tip: If you put the sponge to the one side of the marzipan, I found it easiest to "roll" the sponge over and over onto the marzipan instead of lifting the marzipan up onto the sponge 22. Carefully flip the cake over so that the seam is under the cake and score the top of the cake with a knife, you can also crimp the top corners with your fingers to decorate
23. Neaten the ends of the cake and remove excess marzipan by trimming off a small bit of cake on both ends to reveal the pattern.


Coffee and Walnut Battenberg: Servings: +- 8

Ingredients

¾ cup (1½ sticks) 175gm / 6 oz Unsalted Butter, softened & cut in cubes
¾ cup / 175 g/ 6 oz Caster Sugar
1¼ cups / 175 g / 6 oz Self-Raising Flour (***see end of doc on how to make your own)
3 Large Eggs, room temp
½ cup / 65 gm / 2 1/3 oz Ground Almonds (Can be substituted with ground rice)
3/4 tsp / 3½ gm Baking Powder
3 tsp (15 ml) Milk
½ tsp (2½ ml) Vanilla Extract
1½ tsp (7½ ml) 7 gm Instant Coffee Powder or Granules
3 Tbsp / 25gm / 1 oz Walnuts, roughly chopped 

To Finish
½ cup (1 stick) 115gm /4 oz Unsalted Butter 
2 cups / 225gm /8 oz Powdered (Icing/Confectioners') Sugar
½ tsp / 2 gm Instant Coffee
1½ tsp (7½ ml) Milk or Cream 
1 cup / 225 gm /8 oz Marzipan, natural or yellow 

Directions:
1. Preheat oven to moderate 350°F/180°C/160°C Fan Assisted/Gas Mark 4
2. Grease an 8”/20cm square baking tin with butter
3. Line the tin with parchment paper, creating a divide in the middle with the parchment (or foil) - Tip: See photos or watch video above for detailed instructions
 4. OR Prepare Battenberg tin by brushing the tin with melted butter and flouring
5. Whisk together dry ingredients (except walnuts and coffee) and combine with the wet ingredients in a large bowl (except vanilla and milk) and beat together just until the ingredients are combined and the batter is smooth
6. Spoon half the mixture into a separate bowl and stir in the vanilla, 1½ teaspoons milk and chopped walnuts
7. Spoon the walnut mixture into the one side of the prepared baking tin
8. Dissolve the coffee in the remaining 1½ teaspoon milk and add to the remaining batter, stir until just combined
9. Spoon the coffee batter into the other half of the prepared baking tin
10. Smooth the surface of the batter with a spatula, making sure batter is in each corner
11. Bake for 25-30mins until the cake is well risen, springs back when lightly touched and a toothpick comes out clean (it should shrink away from the sides of the pan)
12. Leave to cool in the tin for a few minutes before turning out to cool thoroughly on a wire rack The specialised Battenberg cake tin. Because it's such a thick batter I find that if you spread the batter so that it's higher at the edges, when it bakes it helps rise without as much of a curved surface. 13. Once completely cool, trim the edges of the cake with a long serrated knife 14. Cut each sponge in half lengthways so that you are left with four long strips of sponge 
15. Neaten the strips and trim as necessary so that your checkered pattern is as neat and even as possible 16. Combine the buttercream ingredients together and mix until combined
17. Spread a thin layer of buttercream onto the strips of cake to stick the cake together in a checkered pattern (one yellow next to one pink. On top of that, one pink next to one yellow) - Tip: See photos for detailed instructions 
18. Dust a large flat surface with icing sugar then roll the marzipan in an oblong shape that is wide enough to cover the length of the cake and long enough to completely wrap the cake 
19. Spread the top of the cake with a thin layer of buttercream 
20. Place the cake on the marzipan, buttercream side down 
21. Spread buttercream onto the remaining three sides 
22. Press the marzipan around the cake, making sure the join is either neatly in the one corner, or will be underneath the cake once turned over 
23. Carefully flip the cake over so that the seam is under the cake and score the top of the cake with a knife, you can also crimp the top corners with your fingers to decorate 
24. Neaten the ends of the cake and remove excess marzipan by trimming off a small bit of cake on both ends to reveal the pattern

 Chocolate Plastique / Modelling Chocolate: Servings: +- 8

 Dark Chocolate Plastique
 200gm /7 oz Good Quality Dark Chocolate (70% Cocoa content)
 ¼ cup / 60ml /2 oz Light Corn Syrup / Glucose Syrup / Golden Syrup

Milk Chocolate Plastique
200gm /7 oz Good Quality Milk Chocolate (+-50% Cocoa content)
3 Tbsp / 45ml /1½ oz Light Corn Syrup / Glucose Syrup / Golden Syrup

White Chocolate Plastique
200gm /7 oz Good Quality White Chocolate
2 Tbsp / 30ml /1 oz Light Corn Syrup / Glucose Syrup / Golden Syrup 

 Directions: 
1. Melt the chocolate in a double boiler or in a heatproof bowl over a pot of simmering water, stir occasionally 
2. Once completely melted, remove from heat and allow to cool a bit
3. Stir in corn syrup / glucose syrup / golden syrup, it will seize up almost immediately, just keep stirring until mixed and it comes away from the side of the bowl
4. Transfer chocolate into a sealable bag, spread the chocolate out then seal the bag
5. Leave overnight or refrigerate for about 2 hours until completely firm
6. Turn out from the bag and knead on a surface dusted with powdered sugar, at first it will just break , but as you knead, it will warm up and start to become pliable
7. Knead until it's pliable enough to roll out or mould, 5 - 10mins . . . . . 

Storage Instructions/Tips: - Battenberg will keep for 3-4 days stored at room temperature in an airtight container - Keep chocolate plastique in an airtight container at room temperature, it will keep for as long as the expiry date on the chocolate wrapper

Additional Information:
 How to make your own self raising flour: 
 1 cup Self Raising Flour = 1 cup / 115g All Purpose Flour + 1 ½ tsp Baking Powder + ¼ tsp Salt (omit salt if there is salt in the recipe) sifted together

Mary Berry's Coffee and Walnut Battenberg http://www.bbc.co.uk/food/recipes/coffee_and_walnut_88342 Rubik's Cube Battenberg http://www.instructables.com/id/Rubiks-Battenburg-Cake/ Some more fun with colours http://www.sprinklebakes.com/2011/10/batty-battenburg-cake-and-ghoulish.... 
Two coloured Nine square patterned Battenberg http://www.objetivocupcake.com/2011/05/el-16-de-junio-me-va-dar-un-ataqu... 
Egg Free Pound Cake http://www.bestallergysites.com/egg-free-cake-recipe/
Vegan Yellow Cake http://dairyfreecooking.about.com/od/cakes/r/Recipe_VeganYellowCake.htm Chocolate Plastique/Modelling Chocolate http://www.joyofbaking.com/ModelingChoc.html (For DBers who don’t have access to corn syrup, replace the corn syrup with golden or glucose syrup)
Uncooked Marzipan Recipes http://www.bbcgoodfood.com/recipes/8164/easy-vanilla-marzipan

how to make a battenberg cake
http://www.youtube.com/watch?v=B4KsFpwmKUA

Cooked Marzipan Recipes http://www.deliaonline.com/recipes/type-of-dish/party-food/accompaniment... http://thecookieshopinenglish.wordpress.com/2009/09/08/diy-marzipan/

 Disclaimer: The Daring Kitchen and its members in no way suggest we are medical professionals and therefore are NOT responsible for any error in reporting of “alternate baking/cooking”. If you have issues with digesting gluten, then it is YOUR responsibility to research the ingredient before using it. If you have allergies, it is YOUR responsibility to make sure any ingredient in a recipe will not adversely affect you. If you are lactose intolerant, it is YOUR responsibility to make sure any ingredient in a recipe will not adversely affect you. If you are vegetarian or vegan, it is YOUR responsibility to make sure any ingredient in a recipe will not adversely affect you. The responsibility is YOURS regardless of what health issue you’re dealing with. Please consult your physician with any questions before using an ingredient you are not familiar with. Thank you!