Monday, 30 April 2012

La torta frangipane per MTC - frangipane cake, baklava rivisited

Memories like the corners of my life...da da da da da da da daaaaaaaaaa, da  da  da da daaaaaa.......

Ora voi direte ma se uno deve preparare una torta frangipane, ma che cosa può venire in mente? E il profumo di frangipane cosa può evocare?
Eh, eh, guarda Ambra de "Il gatto ghiotto" dove mi hai portato o meglio, riportato con la sfida di MTC di Aprile.

La primissima casetta dove ho abitato a Sydney, e anche l'unica che  avesse un albero di frangipane. Quello era un esemplare di plumeria dai fiori bianchi e gialli e risiedeva "in the front yard".


Fleurs de Frangipanier (Île de la Réunion)
da qui con creative commons licence


Incredibile ma vero, ho dovuto fare uno sforzo di memoria per ricordare l'indirizzo, ma, con google maps mi sono subito orientata ed ho individuato la casa, che dopo decenni, ovviamente, non si poteva pretendere fosse uguale. Ed infatti le case nella zona sono state un po' tutte rimodernate, ampliate e al posto dell'albero ora c'è probabilmente una nuova stanzetta.  Peccato, scherzi che accadono a chi vuole tornare nei luoghi dell'infanzia :).  Ho solo un dubbio sul numero civico ma per ora propendo per la casa color pesca.
Prima c'era un muretto in pietra e della scalette che portavano al giardino.


la casetta-dove c'era l'albero di frangipane_1
la casetta dove c'era l'albero di frangipane. Forse questa...


la casetta-dove c'era l'albero di frangipane
o questa...


Rose Bay_la marina
Rose Bay la marina - the waterfront


rosebay_overview
Rose Bay - vista aerea - a destra parco, campi sportivi e campo da golf


Sydney_harbour_rosebay
Sydney Harbour, parte est - The  Eastern suburbs


All'epoca ero una ragazzina, non avevo mai visto un albero di frangipane in Italia e quindi me ne ero subito innamorata e per sempre. Altro che diamanti!  Solo l'anno scorso ne ho visto uno in un vivaio vicino casa qui a Roma ma l'"Orzo" mi ha subito tirato via, come fa quando adocchio una "caccavella" con l'aria di volerla acquistare. Certo alla neve di quest'anno...non sarebbe sopravvissuto se non in serra.
Il profumo del fiore, io lo ricordo, al momento a torto o a ragione, simile a quello del gelsomino, e quindi ho pensato di provare ad aromatizzare la crema con questo sostituto. Ho visto che un'amica di MTC mi ha preceduto con questa idea (avevo ragione a non sbirciare mai prima???) e inizialmente ho pensato di usare comunque questa essenza, ma volevo, appunto l'essenza, che in erboristeria non ho trovato. Anche se mi è stato dato un consiglio, ma questa è una storia per un'altra puntata.

Nel frattempo, c'è stato il compleanno di una mia amica, Rosetta, ed il 25 aprile, anche onomastico dell'"Orzo". La crema frangipane, in guscio di pasta frolla con la ricetta di Ambra sono state utilizzate tutte e due le volte, per andare a formare due crostate alla frutta, ma questo sarà oggetto di separato post.

La torta delle torte, la mia torta frangipane con la quale partecipo è questa:

DSCN9727 - frangipane_baklava_franklava_baklapane 

Avevo appunto sperimentato la crema frangipane nelle crostate alla frutta, dove devo dire, perdeva un po'. allora ho pensato di lavorare per andare a rinforzare il sapore. Quindi mandorle su mandorle e altra frutta secca, e un pochino meno zucchero nella frangipane. E così mi è venuto in mente uno dei miei dolci preferiti, la baklava, per  la quale io e il mio fidanzatino, partivamo apposta da casa, a Sydney, per andare nella zona della Stazione, il quartiere arabo, dove  take-away libanesi vendevano questi dolci, che trovavamo a forma triangolare, romboidale o quadrata a seconda dello spacciatore. Quando, finalmente, in Italia è stato possibile trovare al pasta fillo - peraltro con l'aiuto di una condomina di CI - ho imparato a farli da sola, visto che qui ancora era difficile trovarli.
In questo dolce, il profumo della cannella, del miele e del chiodo di garofano, che si sprigionano da sotto il delizioso strato di crema frangipane all'arancio è un connubio che mi fa impazzire!!!! Ho prestato moltissima attenzione che il gusto dolce non  fosse sovrabbondante, ed a mio avviso i sapori sono perfettamente bilanciati.

La  FRANKLAVA o BAKLAPANE

per una torta di 22 cm di diametro

La lista della spesa:

Per la pasta frolla:
- 200 g di farina 00 (debole)
- 100 g di zucchero semolato
- 100 g di burro
- 1 uovo
- 1 pizzico di sale
- la scorza grattugiata di mezza arancia

Per la crema frangipane:
- 100 g di farina di mandorle (o mandorle pelate)
- 100 g di burro appena ammorbidito
- 100 g di zucchero semolato ( io ho usato 80 g)
- 1 uovo
- 30g di fecola di patate/maizena
- 1 cucchiaio di acqua di fiori d'arancio (tassativa)
- buccia grattugiata di un'arancia (tassativa pure questa)

Per farcire e decorare:
- Mix per baklava
80 g di noci tritate grossolanamente
80g di mandorle tritate grossolanamente
40 g di pistacchi tritati grossolanamente
25 g di zucchero
1 solo cucchiaio di miele di acacia
1 o 2 cucchiaini di cannella in polvere
1/2 cucchiaino di chiodi di garofano in polvere (altrimenti macinare con macinino per spezie?)
- Una manciata di pistacchi tritati da spargere sopra alla crema frangipane


1) Preparare la frolla: Lavorare il burro freddo a tocchetti con la farina, il sale e lo zucchero fino ad ottenere un composto sbriciolato, aggiungere l'uovo leggermente sbattuto ed incorporarlo velocemente al composto insieme alla scorzetta d'arancia grattugiata. Formare una palla, metterla nella pellicola e riporla in frigorifero per un'ora circa.

2) Stendere la frolla in uno strato sottile e foderarvi una tortiera (meglio se col fondo amovibile) precedentemente imburrata ed infarinata. Sistemare il mix di frutta seccca speziato ed amalgamato con il poco miele.

3) Nel frattempo preparare la crema frangipane: Montare il burro con lo zucchero fino ad ottenere una crema spumosa, aggiungervi l'uovo leggermente sbattuto e l'acqua di fiori di arancio sempre lavorando con lo sbattitore, incorporare la farina di mandorle (o le mandorle precedentemente tritate finemente nel mixer con un paio di cucchiai di zucchero) poco per volta,  la fecola (o maizena) e la buccia d'arancia, continuando a montare.

4) Coprire con la crema frangipane livellandola bene con una spatola a coprire tutti gli spazi e a formare uno strato omogeneo. Cospargere con i rimanenti pistacchi tritati e infornare a 180°C per circa 20/30 minuti, finchè non sarà ben dorata e croccantina in superficie ma morbida al taglio. Lasciare raffreddare nel forno aperto. 

NOTE di Ambra: 
1) La dose di crema frangipane è sufficiente appena per coprire una teglia di 22cm di diametro, se volete utilizzarne una più grande dovrete duplicare le dosi.

2) La crema frangipane può essere messa o a contatto con la frolla e poi farcita in superficie con frutta o altro o utilizzata come ho fatto io a copertura della farcia

3) Se partite dalle mandorle pelate ricordatevi di togliere i 2 cucchiai di zucchero dai 100g previsti per la preparazione della crema stessa


Se volete sformare il dolce è opportuno cuocerlo il una teglia con il fondo sollevabile come quella che vedete  qui che è della Kaiser, di ottima qualità.


Con questo post partecipo all'MT Challange di Aprile 2012


Friday, 27 April 2012

Nazook for Daring Bakers, april 2012 Armenian sweets


DSCN9709 - Nazook_blog


I promise to translate this into Italian, too!!!


The Daring Bakers’ April 2012 challenge, hosted by Jason at Daily Candor, were two Armenian standards: nazook and nutmeg cake. Nazook is a layered yeasted dough pastry with a sweet filling, and nutmeg cake is a fragrant, nutty coffee-style cake.

I made Nazook only. The pastry is lovely, flaky as if it were puff pastry and yet it is not. I decided to make the simple version as given by Jason, with its delicious, mouthwatering, vanilla scent.
Really quick to make, assemble and bake (resting time apart), in our home these sweets disappeared in a few seconds - Luckily I had made only half a batch!
As I tasted them I thought that a filling with nuts would be delicious for them. Jason had said so. I quote "Variations allowed: Filling variations abound for nazook, so you can fill them with what you like. The traditional vanilla-scented filling is the most common, but you can also add about ½ cup of ground walnuts, almonds, pecans, or even mahleb (if you can find it; it’s a powder made from the pits of dark cherries, and has a cherry/almond aroma). My aunt insists just about anything sweet…except chocolate…will work, but if you want to deviate even further, be my guest (go ahead and try chocolate, if you like; I won’t tell my aunt!)"

I myself am most interested in learning about different ethnic traditions and I particularly thank Jason  because by choosing these recipes for Daring Bakers' he  allowed us  to learn something about Armenian traditions. I will be adding to my post a little research work about Armenia in the next few days., so stay tuned.

NAZOOK

Yields 40 pieces
Video instructions by  Jason's aunt Aida

Ingredients
Pastry dough

3 cups (720 ml) (420 gm/15 oz) all-purpose (plain) flour, sifted
2½ teaspoons (12½ ml) (7 gm) (¼ oz) (1 packet) active dry yeast
1 cup (240 ml) (225 gm/8 oz) sour cream
1 cup (2 sticks) (240 ml) (225 gm/8 oz) softened butter (room temperature)
Filling

1 1/2 cups (360 ml) (210 gm) (7½ oz) all-purpose (plain) flour, sifted
1 1/2 cups (360 ml) (340 gm/12 oz) sugar
3/4 cup (1½ sticks) (180 ml) (170 gm/6 oz) softened butter (room temperature)
2 teaspoons (10 ml) vanilla extract
Wash

1-2 egg yolks (for the wash; alternatively, some yogurt, egg whites, or a whole egg)
Directions:

Make the Pastry Dough
1. Place the sifted flour into a large bowl.
2. Add the dry yeast, and mix it in.
3. Add the sour cream, and the softened butter.
4. Use your hands, or a standing mixer with a paddle attachment, to work it into a dough.
5. If using a standing mixer, switch to a dough hook. If making manually, continue to knead for about 10 minutes, or until the dough no longer sticks to the bowl or your hands. If it remains very sticky, add some flour, a little at a time.
6. Cover the dough and refrigerate for 3-5 hours, or overnight if you like.

Make the filling
7. Mix the flour, sugar, and the softened butter in a medium bowl.
8. Add the vanilla extract.
9. Mix the filling until it looks like clumpy, damp sand. It should not take long. Set aside.

Make the nazook
10. Preheat the oven to moderate 350°F/175°C/gas mark 4.
11. Cut the refrigerated dough into quarters.
12. Form one of the quarters into a ball. Dust your working surface with a little flour.
13. Roll out the dough into a large rectangle or oval. The dough should be thin, but not
transparent.

14. Spread 1/4 of the filling mixture across the rolled-out dough in an even layer. Try to spread the filling as close as possible to the edges on the short sides, but keep some of pastry dough uncovered (1 inch/2.5 cm) along the long edges.
15. From one of the long sides, start slowly rolling the dough across. Be careful to make sure the filling stays evenly distributed. Roll all the way across until you have a long, thin loaf.

16. Pat down the loaf with your palm and fingers so that it flattens out a bit (just a bit).
17. Apply your egg yolk wash with a pastry brush.

18. Use your crinkle cutter (or knife) to cut the loaf into 10 equally-sized pieces. Put onto an ungreased cookie sheet.

19. Place in a preheated moderate oven for about 30 minutes, until the tops are a rich, golden brown.

20. Allow to cool and enjoy!

The cake I did not make :))


ARMENIAN NUTMEG CAKE

Picture by Jason of Daily Candor - all right reserved

Makes one 9”/23cm cake which yields 12 servings
Video Instructions by me

Ingredients

1 cup (240 ml) milk (I use whole, but nonfat or lowfat should be fine; non-dairy might work just fine, as well)
1 teaspoon (5 ml) (5 gm) baking soda
2 cups (480 ml) (280 gm/10 oz) all-purpose (plain) flour (I suspect pastry flour or another low-gluten flour might even work better to achieve a light, fluffy crumb)
2 teaspoons (10 ml) (10 gm) (? oz) baking powder (I used single-acting, because it's aluminum-free, and it turned out fantastic)
2 cups (480 ml) (400 gm/14 oz) brown sugar, firmly packed
3/4 cup (1½ sticks) (180 ml) (170 gm/6 oz) butter, preferably unsalted, cubed
1/2 cup (120 ml) (55 gm/2 oz) walnut pieces, may need a little more
1 to 1-1/2 teaspoons (5 to 7 ½ ml) (5 to 8 gm) ground nutmeg (try to grate it fresh yourself; the aroma is enchanting)
1 egg
Directions:

Directions - the Traditional Way (The Fast, Easy Way further down)
1. Preheat your oven to moderate 350°F/175°C/gas mark 4.
2. Mix the baking soda (not baking powder; that's for the next step) into the milk. Set it aside.
3. Sift together the flour and the baking powder into a large bowl. One sift is fine
4. Add the brown sugar. Go ahead and mix the flour and brown sugar together. Or not.
5. Toss in the cubed butter.

6. Mash the butter with a fork into the dry ingredients (you can also use your fingers if you want). You'll want to achieve a more-or-less uniform, tan-colored crumbly mixture.

7. Take HALF of this resulting crumbly mixture into your springform (9”/23cm) pan. Press a crust out of it using your fingers and knuckles. It will be easy.

8. Crack an egg into a mixer or bowl.
9. Toss the nutmeg in with the egg.
10. Start mixing slowly with a whisk attachment and then increase to medium speed, or mix with a hand whisk if you're doing it manually. Once it's mixed well and frothy (about 1 minute using a standing mixer, or about 2-3 minutes of vigorous beating with a whisk), pour in the milk and baking soda mixture. Continue to mix until uniform.
11. Pour in the rest of the crumbly mixture. Mix that well, with either a paddle attachment, or a spatula. Or continue to use the whisk; it won't make much of a difference, since the resulting batter is very liquidy.

12. Pour the batter over the base in the springform pan.

13. Gently sprinkle the walnut pieces over the batter.

14. Bake in a preheated moderate oven for about 30-40 minutes. You'll know it's done when the top is a golden brown, and an inserted toothpick comes out clean.
15. Allow to cool in the pan, and then release. Enjoy!

An Even Easier Way...if you have a Food Processor

1. Preheat your oven to moderate 350°F/175°C/gas mark 4 .
2. Mix the baking soda (not baking powder) into the milk. Set aside.
3. Put the flour, baking powder, and the brown sugar into your food processor. Pulse until uniformly mixed.
4. Toss in the cubed butter. Pulse until uniformly mixed into tan-colored crumbs.
5. Pour HALF of the crumbs into your springform (9”/23cm) pan. Press out a crust using your fingers and knuckles.
6. Crack the egg into the food processor with the rest of the crumbs still in it.
7. Grate 1 to 1-1/2 teaspoon of nutmeg. Toss that into the food processor, too. Pulse until well-incorporated.
8. Pour in the milk and baking soda mixture. Continue to mix until a slightly lumpy tan batter is formed.
9. Pour the batter over the crust in the springform pan.
10. Gently sprinkle the walnut pieces over the batter.
11. Bake in a preheated moderate oven for 30-40 minutes. It's ready when the top is golden brown, and when it passes the toothpick test (comes out clean).
12. Cool the cake in the pan, and then dig in. Yum yum!

Freezing/Storage Instructions/Tips: Nazook will keep in an airtight container at room temperature for a couple of weeks, and the Armenian nutmeg cake will keep (covered) at room temperature for 2-3 days. Both taste even better still warm from the oven.

Allow to cool completely before attempting to freeze. Nazook will freeze best if put in a freezer bag with all the air squeezed out. Armenian Nutmeg Cake will also freeze fairly well if completely sealed. Both can be frozen for up to 3 months.

Additional Information:

Both recipes might be able to be adapted to be gluten-free and/or vegan, although I have not tried myself. Gluten-free flour, coconut oil (instead of butter), pureed silken tofu (instead of sour cream), and nut milk (instead of egg yolk) might be useful starting points.


Wednesday, 28 March 2012

Stevia rebaudiana: lo zucchero del futuro?

Non è la prima volta che ne sento parlare, ma la settimana scorsa Geo & Geo me ne ha ricordato l'esistenza.
La stevia è una pianta nativa del Sud America e più precisamente del Brasile e del Paraguay.


Stevia
Stevia rebaudiana
picture by hebam3000

Ne voglio parlare perchè ha delle proprietà interessanti, e da relativamente poco tempo è stata autorizzata la commercializzazione nel vecchio continente, Svizzera in testa.

E' un potentissimo dolcificante, che non ha apporto nutrizionale, quindi le calorie assunte sono pari a zero.  I principi attivi sono contenuti nelle foglie. Pensate che differenza alla qualità di vita di un diabetico possono fare i dolcificanti derivati dalla stevia. Ed anche chi non ha problemi di diabete può mangiarsi un dolcetto, detraendo un bel po' di calorie rispetto allo stesso dolce fatto con lo zucchero!!!
Infine lo zucchero e le foglie di stevia, si prestano anche alla cottura perchè i componenti naturali sono abbastanza stabili in situazione di alte temperature.
Un unico accorgimento. Dato l'elevato potere dolcificante ci si dovrà abituare a ridurre vistosamente le dosi rispetto a quelle che siamo soliti adoperare per lo zucchero.
Le popolazioni Sud Americane l'adoperano da millenni, e noi abbiamo dovuto aspettare fino ad adesso per poterla usare. Meglio tardi che mai!

In erboristeria ho visto il prodotto in gocce, attendo di mettere le mani sui cristalli!

Prima di pubblicare questo post l'ho riletto e ho avuto la netta sensazione che fosse uno spot pubblicitario. Non ho voluto però rielaborarlo, è stato scritto di getto e non è sponsorizzato da nessuno - se un mio post ha uno sponsor lo indico chiaramente e non accetto e mai ho accettato di fare pubblicità occulta, anche se mi è stato proposto. Se sembra uno spot è per via dell'entusiasmo che mi ha generato lo scoprire una fonte di zucchero a calorie zero. Ho pensato subito a persone care che non mangiano dolci per problemi di salute, e devo ammetterlo anche ai miei chili di troppo. :)))
Preciso, anzi, che come tutte le cose che si iniziano ad usare per la prime volta, bisognerà avvicinarsi con cautela e moderazione e soprattutto dopo essersi ben documentati a questa bella pianta ed ai suoi derivati.


La coltivazione.

Buone notizie. E' riproducibile per talea e con più fatica da seme. Ecco qui una piantina che ha radicato dopo essere stata in acqua per due settimane.


Stevia rooted cutting after 14 days in water : bouturage de Stevia
talea di stevia
picture by hardworkinghippy

In un clima caldo è sempreverde altrimenti,  va considerata come una semiperenne - in situazioni di gelo - perde le foglie per poi emetterne delle nuove  in primavera. In clima freddi può essere pacciamata per proteggerne la parte radicale, oppure più semplicemente riparata in serra.

Non vedo l'ora di mettere le mani anche su una di queste piante!!! Ne vorrei fare una piantagione,   :))


Stevia Rebaudiana
fiori di stevia - stevia flowers
picture by Iskrida


Drying Stevia
strevia foglie essiccate
picture by hardworkinghippy


Fonti ed approfondimenti:
Wikipedia

Tuesday, 27 March 2012

Dutch Crunch Bread for Daring Bakers March 2012


DSCN9568 - Blog_Dutch Crunch Bread Roll

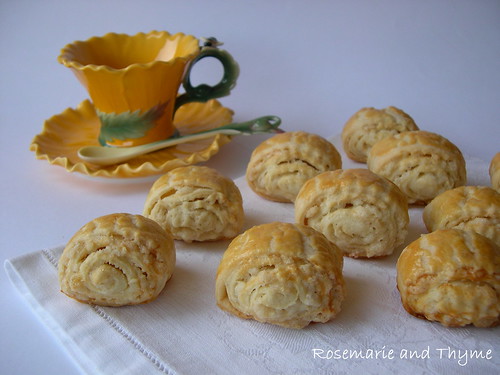
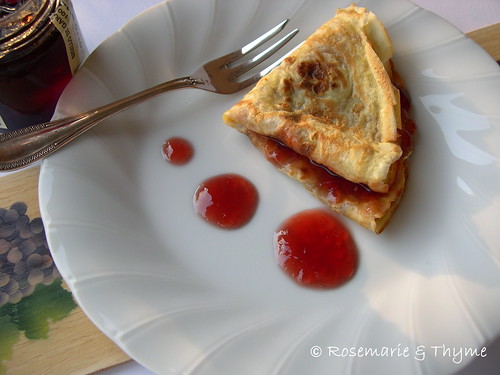
Here I am with my Dutch Crunch Bread Rolls. I was really curious about this type of bread I never heard of.


Some similaries with Sara and Erica? I also stared baking when I was at Law School.  In Sydney, in the Land od Oz :)


I decided to make the 6 rolls recipe and I filled my bread rolls one with bresaola, rucola and potato, the other with bresaola and sun dried tomatoes. Bresaola is a typical italian product. Salmon and rucola would also have been nice. Rucola is just starting to grow outside now, so I thought I'd choose in season veggies from my garden!


I had absolutly no trouble with the dough making process. I just had to add a little more water than indicated, but that was probably my fault as I put in all 4 cups of flour without checking if the last half cup was needed. I don't know, but I'll check with fellow Daring Bakers.


La vesione in italiano è più in basso nella pagina.                          Scroll down for the Italian version.


----------------.----------------


And here is what Sara and Erica from Baking JDs wrote to us Daring Bakers to help us with our Dare. I always prefer to quote the author.

First, let us introduce ourselves. We are Sara and Erica from Baking JDs. During our first year of law school, we discovered Daring Bakers and decided that monthly baking was just the thing to get us to take a break from our studies and do something that we both already loved. Since we graduated in May 2010, we’ve continued the tradition. As busy attorneys, it hasn’t gotten any easier to find the time, but it’s always worth it.

Both of us live in San Francisco, which is home to all kinds of culinary traditions. Of course, sourdough bread is one of the first things that springs to people’s minds. For our challenge, however, we’ve decided to make Dutch Crunch bread. Sara grew up in the Bay Area, but was dismayed when she moved away for college that Dutch Crunch bread is not usually available outside of Northern California. For many folks from the Bay Area, a sandwich just isn’t complete without Dutch Crunch bread.

Technically, Dutch Crunch doesn’t refer to the type of bread, but rather the topping that is spread over the bread before baking. In Dutch it’s called Tijgerbrood or “tiger bread” after the tiger-like shell on the bread when it comes out of the oven. The final product has a delightful sweet crunch to it that makes it perfect for a sandwich roll. It’s a common option at sandwich shops all over the Bay Area and is often one of the first breads to run out.

Learn more about the history of Dutch Crunch bread, particularly in the Bay Area, here, here, and here.

Therefore, the heart of this challenge is the topping. While we’ve provided a few bread recipes that worked great for us, it is up to you what rolls or loaves you want to turn into Dutch Crunch, which should leave room for vegan and gluten-free options. We’d recommend a nice, soft sandwich-appropriate roll with not too much crust, so the topping can really stand out. Once you have your final loaves, you’re required to use your bread to construct a sandwich of your choice!


Our choice? Anything involving avocado, of course! We can’t wait to see what you come up with.

Recipe Source: The recipe for the Dutch Crunch topping came from Rose Levy Beranbaum’s The Bread Bible. The recipes for the breads we’ve suggested came from The Bread Bible and an adaptation of a recipe found on bakingbites.com (http://bakingbites.com/2006/09/cooking-school-dutch-crunch-bread/).

Blog-checking lines: Sara and Erica of Baking JDs were our March 2012 Daring Baker hostesses! Sara & Erica challenged us to make Dutch Crunch bread, a delicious sandwich bread with a unique, crunchy topping. Sara and Erica also challenged us to create a one of a kind sandwich with our bread!

Posting Date: March 27, 2012


A Note about Rice Flour: While rice flour is easy to find in San Francisco, we weren’t sure of its availability around the world. If it’s not in your local grocery store, we suggest checking in a specialty shop (somewhere that would sell gluten-free foods) or online (e.g., amazon.com). Be sure not to buy the sweet or glutinous variety, though we’ve found that either white or brown rice flour works just fine.

If you are unable to find it, or if you’re just curious about how to make it yourself, it’s not very hard to do at all. There are a number of tutorials online, but the basic idea is to put rice in a spice grinder or something else that can break grains, and grind it until it is a fine flour-like powder. You will likely need to sift the final product through a sieve.


We found that home-made rice flour altered that balance of ingredients in the topping recipe, specifically requiring more rice flour to make it the appropriate paste-like consistency. As we note below, you want the topping to form a thick layer on the bread. If it’s too watery or drippy, it will not stay on top of the bread and crack like it’s supposed to.

Here are some helpful links, but we encourage you to rely on whatever method you find easiest for making rice flour, if you decide to make it yourself.

Mandatory Items: You must make the Dutch Crunch topping and use it on your choice of bread or roll. You must use your finished bread to construct a sandwich of your choice – the more creative the better!

Variations allowed: You may use any bread or roll recipe. We have provided suggestions but if you use your own recipe we recommend opting for a soft roll or bread. You may buy rice flour or make your own. While you must make a sandwich, the variety is up to you!

Preparation time: Dutch Crunch Topping: 15 minutes active time, 15 minutes passive time; Soft White Roll: 20 minutes active time, 2 hours passive time; Brown Rice Bread: less than 1 hour active time; 2-3 hours passive time.

Equipment required:
Small bowl
2 large bowls, or a large bowl and a stand-mixer bowl
Stand mixer with paddle (or whisk) and dough-hook attachments (optional)
Wooden and regular spoon(s)
Whisk
Knife or dough cutter/scraper (optional, depending on your recipe)
Bread pan(s) or baking tray(s)
Plastic wrap or something else to cover the dough while it rises

Dutch Crunch Topping

Servings: This recipe should make sufficient topping for two 9x5 loaves (23cmx13cm) or 12 rolls. If you make only 6 rolls in the first soft white roll recipe, you can cut the topping recipe in half.

We’ve provided this recipe first because it is the mandatory aspect of the challenge. Note, however, that you should not prepare the topping until the bread you’ve selected to bake is almost finished rising (~15 minutes from baking).

Ingredients

2 tablespoons (2 packets) (30 ml) (15 gm/½ oz) active dry yeast
1 cup (240 ml) warm water (105-115º F) (41-46°C)
2 tablespoons (30 ml) (30 gm/1 oz) sugar
2 tablespoons (30 ml) vegetable oil
½ teaspoon (2½ ml) (3 gm) salt
1½ cups (360 ml) (240 gm/8½ oz) rice flour (white or brown; NOT sweet or glutinous rice flour) (increase by 1 cup or more for home-made rice flour)

Directions:

1.         Combine all ingredients in a large bowl and beat with a whisk; beat hard to combine. The consistency should be like stiff royal icing – spreadable, but not too runny. If you pull some up with your whisk, as shown below, it should drip off slowly. Add more water or rice flour as necessary. Let stand 15 minutes.


2.         Coat the top of each loaf or roll with a thick layer of topping. We tried coating it with a brush but it worked better just to use fingers or a spoon and kind of spread it around. You should err on the side of applying too much topping – a thin layer will not crack properly.
3.         Let stand, uncovered, for any additional time your recipe recommends. With the Soft White Roll, you can place the rolls directly into the oven after applying the topping. With the Brown Rice Bread, the loaves should stand for 20 minutes with the topping before baking.
4.         When baking, place pans on a rack in the center of the oven and bake your bread as you ordinarily would. The Dutch Cruch topping should crack and turn a nice golden-brown color.

Soft White Roll

Servings: Six sandwich rolls

This recipe approximates the quintessential white sandwich roll found throughout the Bay Area. The recipe is simple, quick, and addictive.

Ingredients

1 tablespoon (1 packet) (15 ml) (7 gm/ ¼ oz) active dry yeast
¼ cup (60 ml) warm water (105-110º F) (41-43°C) (No need to use a thermometer – it should feel between lukewarm and hot to the touch).
1 cup (240 ml) warm milk (105-110º F) (41-43°C) (We’ve tried both nonfat and 2%, with no noticeable difference)
1½ tablespoons (22½ ml) (20 gm/ ? oz) sugar
2 tablespoons (30 ml) vegetable oil (plus additional olive or vegetable oil for greasing bowl during rising)
1½ teaspoons (7½ ml) (9 gm/? oz) salt
Up to 4 cups (960 ml) (600 gm/21oz) all purpose flour

Directions:

1.         In the bowl of an electric mixer or large mixing bowl, combine yeast, water, milk and sugar. Stir to dissolve and let sit for about 5 minutes (The mixture should start to bubble or foam a bit and smell yeasty).

2.         Add in vegetable oil, salt and 2 cups of flour. Using the dough hook attachment or a wooden spoon, mix at medium speed until the dough comes together. (The photo to below is with the first 2 cups of flour added).

3.         Add remaining flour a quarter cup at time until the dough pulls away from the sides of the bowl, as shown in the photo below (For us, this usually required an additional 1½ to 2 cups of flour).

4.         Turn out onto a lightly floured surface and knead for about 4 minutes, until smooth and elastic.
5.         Place in a lightly greased bowl and cover with plastic wrap. Let rise for 1 hour, or until doubled (or more) in size (see photo comparison).

6.         Once the dough has risen, turn it out onto a lightly floured surface and divide it into 6 equal portions (if you’d like to make rolls) or 2 equal portions (if you’d like to make a loaf) (using a sharp knife or a dough scraper works well). Shape each into a ball or loaf and place on a parchment-lined baking sheet (try not to handle the dough too much at this point).
7.         Cover with plastic wrap and let rise for 15 minutes while you prepare the topping.
8.         Coat the top of each roll or loaf with the topping as described above. While the original recipe recommends letting them stand for 20 minutes after applying the topping, I got better results by putting them directly into the oven.
9.         Once you’ve applied the topping, bake in a preheated moderately hot 380ºF/190°C/gas mark 5 for 25-30 minutes, until well browned. Let cool completely on a wire rack before eating.

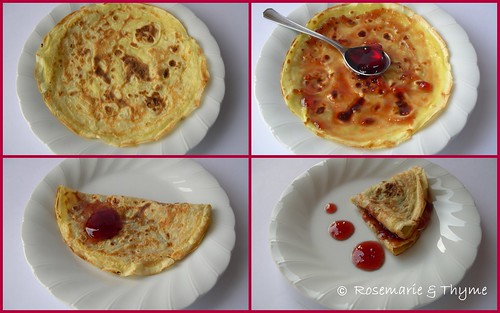
Our finished products: Note the roll in the foreground on the left. This is what happens if you don’t put enough topping on the bread – no cracking! So be sure to load on the topping.


Brown Rice Bread

Servings: Two 9x5 inch (23cmx13cm) loaves

If you’re up for more of a challenge, this recipe creates an interesting bread that incorporates cooked brown rice—something that was new to us. The resulting loaf has, as Hensperger describes, a “nubbly” texture and a very light almost-sweetness to it. Great for toasting.

Ingredients

1 cup (240 ml) warm water (105-115ºF) (41-46°C)
2 tablespoons (2 packets) (30 ml) (15 gm/½ oz) active dry yeast
1 teaspoon (5 ml) (5 gm) sugar or honey (we used sugar, which worked great)
1 cup (240 ml) warm buttermilk (105-115 ºF) (41-46°C)
½ cup (120 ml) honey
¼ cup (60 ml) vegetable oil (plus additional olive or vegetable oil for greasing bowl during rising)
1 tablespoon (15 ml) (20 gm/? oz) salt
2 cups (480 ml) (200 gm/7 oz) cooked and cooled short-grain brown rice
5½ -6 cups (1440 ml) (840 gm/30 oz) unbleached all-purpose flour or bread flour

Directions:

1.         Pour the warm water in a small bowl. Sprinkle yeast and sugar over surface. Stir to dissolve and let stand at room temperature until foamy, about 10 minutes.
2.         In a large bowl using a whisk or in the work bowl of a heavy-duty mixer fitted with the paddle attachment, combine the buttermilk, honey, oil, and salt. Add the rice and beat until smooth.

3.         Add the yeast mixture and 2 cups flour. Beat hard until smooth for 3 minutes.
4.         Add the flour, ½ cup at a time, until a soft, bulky dough that just clears the side of the bowl is formed.
5.         Turn the dough out onto a lightly floured work surface and knead until smooth and springy, about 5 minutes, dusting with flour 1 Tbsp. at a time as needed to prevent sticking. This dough will be slightly sticky. (If kneading by machine, switch from the paddle to the dough hook and knead for 4 to 5 minutes, or until the dough is smooth and springy and springs back when pressed. If desired, transfer the dough to a floured surface and knead briefly by hand).
6.         Place the dough in a greased deep bowl. Turn the dough once to coat the top and cover with plastic wrap. Let rise at room temperature until doubled in bulk, 1½ to 2 hours.

7.         Gently deflate the dough. Turn the dough out onto a lightly floured work surface. Grease two 9-by-5-inch (23-by-13 cm) loaf pans. Divide the dough into 2 equal portions. Form the portions into loaves. Let rest 15 minutes.

8.         Coat the top of each loaf with the topping as described above, including letting them stand, uncovered, 20 minutes, until dough rises level with the tops of the pans.

9.         Twenty minutes before baking, preheat the oven to moderately hot 380ºF/190°C/gas mark 5. Place the pans on a rack in the center of the oven and bake 45 to 50 minutes or until brown and the loaves sound hollow when tapped with your finger. Transfer the loaves to a cooling rack. Cool completely before slicing.

Storage & Freezing Instructions/Tips:
Store as you would any bread – in a bread box, a paper bag, or loose plastic wrap. Both varieties suggested are best in the first couple of days. The loaves or rolls can also be frozen in plastic – simply toast to reheat.

Disclaimer: The Daring Kitchen and its members in no way suggest we are medical professionals and therefore are NOT responsible for any error in reporting of “alternate baking/cooking”. If you have issues with digesting gluten, then it is YOUR responsibility to research the ingredient before using it. If you have allergies, it is YOUR responsibility to make sure any ingredient in a recipe will not adversely affect you. If you are lactose intolerant, it is YOUR responsibility to make sure any ingredient in a recipe will not adversely affect you. If you are vegetarian or vegan, it is YOUR responsibility to make sure any ingredient in a recipe will not adversely affect you. The responsibility is YOURS regardless of what health issue you’re dealing with. Please consult your physician with any questions before using an ingredient you are not familiar with. Thank you!

Versione in italiano


San Francisco Bay 
Baia di San Francisco
picture by Sigma under Creative Commons Licence

 Per ottenere sulla crosta del pane l'effetto  visibile nella foto, viene spalmata una pastella poco prima della fine della lievitazione. Questo pane di origine Olandese, è tipico nella zona della Baia di San Francisco. Questo topping può essere messo su qualsiasi tipo di pane. Io ho scelto di eseguire la ricetta dei medaglioni  che in inglese si chiamano bread rolls. Il sapore della crosta è leggermente dolciastro, ma gradevole.
Un unica riserva da parte mia è dovuta alla quantità di lievito indicato. Ho però letto ricette alternative date da altri Daring Bakers che prevedono molto meno lievito. Con buona pace del nostro stomaco.


Dutch Crunch Topping: La pastella

Queste dosi sono sufficienti per ricoprire due pagnotte da 23cm x 13cm o 12 medaglioni. Se fate solo 6 medaglioni con la ricetta qui riportata, dovrete quindi usare mezza dose.

Questa ricetta viene pubblicata prima di quella del pane, essendo l'elemento essenziale della preparazione. Va però sottolineato che il topping va preparato solo quando il pane già messo in forma ha quasi finito di lievitare. Circa un quarto d'ora prima di infornare.

Ingredienti

2 bustine o 15 g di lievito di birra disidratato,
240 ml di acqua tiepida (41-46°C),
30 g di zucchero ,
2 cucchiai di olio di oliva o di semi meglio se di arachidi
3 gm (½ cucchiaino)di sale,
240 g di farina di riso (se la macinate in casa ne servirà anche il doppio)

Mescolare gli ingredienti in una ciotola con una frusta, lavorare bene fin quando si sia amalgamata bene. La pastella deve avere una consistenza cremosa, non troppo liquida. Sollevando un po' di impasto con la frusta, questo deve scivolare via pesantemente. In caso la consistenza non sia quella desiderata, aggiungere un po' di acqua o farina per raggiungere quella giusta.

Spalmare il topping sui panini 15 minuti prima di infornarli. Coprire i panini con uno strato piuttosto spesso usando le dita: se lo strato e' troppo sottile la crosta non si romperà una volta in forno e non si formeranno i tipici disegni.

DSCN9565 - Dutch Crunch Bread_2
in primo piano si nota la buona alveolatura del panino che infatti è risultato soffice e leggero


MEDAGLIONI O BREAD ROLLS


Questa ricetta da un risultato che si avvicina moltissimo ai medaglioni che si trovano nella zona della Baia di  San Francisco conosciuta con il nome di The Bay Area. E' facile, veloce e da assuefazione :)


Ingredienti per 6 medaglioni


1 bustina (7 g) di lievito di birra disidratato,
60 ml di acqua tiepida (41-43°C) fra tiepida e calda,
240 ml di latte tiepido va bene anche parzialmente scremato,
20 g di zucchero,
2 cucchiai (30 ml) di olio di oliva o di arachidi,
1½ cucchiaino o 9 g di sale,
600 g di farina


Mettere in una ciotola o nella tazza della planetaria l'acqua, il lievito, il latte e lo zucchero. Lasciar attivare per 5 minuti (si dovrebbero formare delle bolle in superficie). Aggiungere l'olio, 300 grammi della farina totale di farina ed il sale. Mescolare con un cucchiaio di legno  o con il gancio della plantetaria per amalgamare gli ingredienti e aggiungere il resto della farina un po' alla volta fermandosi se l'impasto risulta troppo asciutto. Poi impastare con il gancio o a mano finché  l'impasto non diventi  liscio ed elastico. Riporre in una ciotola unta d'olio e lasciar riposare coperto con pellicola per un'ora o fino al raddoppio. Dopo questo tempo, riprendere l'impasto e dividerlo in 6 parti uguali, formare delle palline (cercando di non lavoralo troppo per non vanificare la lievitazione), poggiarle su una teglia ricoperta di carta forno, coprirle e lasciarle riposare per 15 minuti. Nel frattempo preparare la copertura.
Spalmare i panini con abbondante copertura e infornarli in forno gia' caldo (200° C). Cuocere per 25-30 minuti finché si saranno formate le caratteristiche crepe sulla superficie e il panino sara' diventato dorato.


Monday, 26 March 2012

Crêpe o crespelle al Morellino di Scansano

DSCN9513 - blog_crêpe al morellino di scansano
minimal crêpe

Insieme al profiteroles durante l'adolescenza ero innamorata  proprio delle crêpe. Soprattutto le crêpe suzette, viste fare flambè al ristorante, dovevano essere mie. Scartabellando sul Talismano della Felicità e trovata la ricetta, la famiglia è stata numerose volte coccolata con questi deliziosi dolcetti.

Questa volta però vi propongo un accompagnamento semplicissimo ma diverso. La gelatina al vino e più precisamente al Morellino di Scansano.
Quando siamo al mare, non manchiamo mai di fare una passeggiata a Scansano a fare un po' di rifornimento di vino. Da Erik Banti o alla cantina sociale. Quindi, per una questione affettiva ho scelto il Morellino.
Io la gelatina l'avevo già in casa. La compro da Manuela  la "Signora delle Spezie" del banco del Mercato di Roma 70. Si rifornisce in Toscana di barattolini di marmellatine, gelatine e salse sfiziose e ci eravamo fatti tentare da questa di gelatina al Morellino. Quando l'abbiamo aperta per assaggiarla, l'ho trovata strepitosa ed ho pensato subito alle crêpe per MTC. Io le ho fatte un po' minimal perchè siamo sotto controllo del regime alimentare :)) ma secondo me una cucchiaiata di panna ci stava benissino. Anche una versione salata con formaggio e gelatina di vino è da tenere in seria considerazione.

Fatta la spesa e accaparrato il burro   ho seguito pedissequamente la ricetta della crêpe data da Giuseppina di The Adventures of a very personal Chef per MTC


collage_ crêpe al morellino di scansano
minimal crêpe in allestimento

Ho visto in rete varie ricette per fare la gelatina di vino in casa, ma mentirei se senza averle provate ve ne consigliassi una o più. Vi prometto però che se mi cimenterò nella produzione proprie sarete i primi a saperlo. Vi anticipo, comunque che viene fatta con l'utilizzo di pectina. 2:1. Mi chiuedo se possa essere fatta semplicemente con la gelatina, ma non so se l'alcol ne inibisce l'addensamento. Farò ulteriori studi.


Il frutto del Morellino di Scansano
morellino - il vitigno
photo by Nadia Fondelli


CRÊPE

La ricetta base di Giuseppina

Per  10/12 crèpes

150 g di farina O,
350 ml di latte,
50 ml d'acqua,
2 uova medie,
1/2 cucchiaino da caffé di sale,
30 gr di burro chiarificato per cuocere 

Questa è la ricetta che uso sempre e con la quale ottengo delle crêpe sottili , leggere e dal gusto irresistibile. Tra gli ingredienti trovate l'acqua ( serve a rendere la  crèpes più sottile) e il burro chiarificato per cuocerle: la sua particolarità è di avere un punto di fumo simile all'olio extravergine di oliva quindi non brucia e dona un sapore delizioso alla crêpe . 
Rompete le uova in una terrina, sbattetele un po con la frusta, cominciate ad aggiungere alternando la farina setacciata e il latte/acqua, mischiate bene fino ad avere una pastella piuttosto liquida e liscia. Aggiungete il sale, mischiate e lasciate riposare almeno un'ora.
Fate sciogliere 30 gr di burro chiarificato in un pentolino, scaldate bene la padella per le crêpe, ungetela con il burro usando un pennello ( possibilmente in silicone) versate la quantità di pastella necessaria per una crêpe ( per una padella di 22 cm io metto 30 ml di pastella) Il consiglio che posso dare è di prepararvi un misurino ed avere cosi la dose esatta da versare, in modo da poterla gettare in un colpo solo. A questo punto fate " ruotare" la padella per spargere uniformente la pasta, fate cuocere fino a che sarà ben dorata, quindi giratela e finite la cottura dall'altra parte. E importante cuocerle a puntino perché é questo che dona loro il sapore. Con questo tipo di crêpe potete fare piatti dolci o salati , io mi son divertita a farne anche di piccoline nel padellino dei blinis ma è un lavoraccio!


05/08/2010
Scansano - Tuscany
photo by Icara


Link