Wednesday 27 February 2013

Crisp Crackers and Flatbreads - Daring Bakers February 2013 Challange

Click here for the Italian version

After baking Gevulde Speculaas, the Dutch spicy, deliciously crunchy filled pie or tart, in February our host for the Daring Bakers Challange  Sarah from All Our Fingers in the Pie chose recipes for Crisp Crackers and Flatbreads.

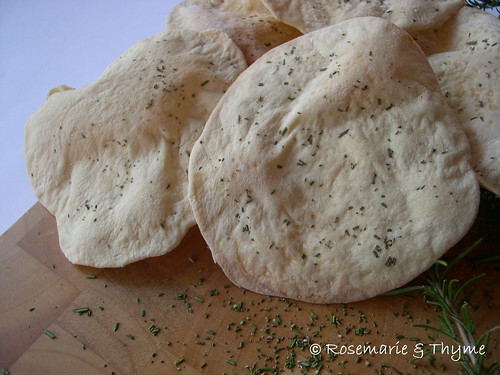
 I started with making the Herbed flatbreads. We really liked them. I decided to use fresh rosemary.


DSCN1536 - Flatbreads1


Here are the original intructions:

Hi, I am Sarah from All Our Fingers in the Pie. I am so excited about this challenge with The Bakers! I can hardly wait to see what ideas you all come up with. I have been on a mission to find all the crisps recipes that I can because they make lovely hostess gifts and healthy nibblies to have in your kitchen.

Recipe Sources:
“Menus from an Orchard Table” by Heidi Noble
“Dinner with Julie” blog with Julie van Rosendahl
Arrowhead Mills
Martha Stewart

Blog checking lines: Sarah from All Our Fingers in the Pie was our February 2013 Daring Bakers’ host and she challenges us to use our creativity in making our own Crisp Flatbreads and Crackers!

Posting Date: February 27th, 2013

Mandatory Items: To make a crisp or crispy flatbread. These recipes are suggestions but let your imagination run free. Soft is not a part of this challenge, so no soft pretzels or soft flatbreads. It must be crispy.

Variations Allowed: Any flavors your mind can create. Any type of flour and ingredients.

Preparation Time:  varies, see each recipe below

Equipment Required:
Mixing bowls, spoons and spatulas
Baking sheet

Raincoast Crisps

From Dinner with Julie blog with Julie van Rosendahl
Servings: About 8 dozen

Ingredients
2 cups (480 ml) (280 gm) (10 oz) all-purpose (plain) flour
2 teaspoons (10 ml) (10 gm) (1/3 oz) baking soda
1/2 teaspoon (2½ ml) (3 gm) salt
2 cups (480 ml) buttermilk
1/4 cup (60 ml) (50 gm) (1¾ oz) brown sugar, firmly packed
1/4 cup (60 ml) honey
1 cup (240 ml) (180 gm) (6½ oz) raisins
1/2 cup (120 ml) (60 gm) (2 oz) chopped pecans
1/2 cup (120 ml) (125 gm) (4½ oz) roasted pumpkin seeds (optional)
1/4 cup (60 ml) (30 gm) (1 oz) sesame seeds
1/4 cup (60 ml) (30 gm) (1 oz) flax seed, ground
1 tablespoon (15 ml) (2 gm) finely chopped fresh rosemary


Directions
Preheat oven to moderate 350°F/180°C/gas mark 4.
In a large bowl, stir together the flour, baking soda and salt. Add the buttermilk, brown sugar and honey and stir a few strokes. Add the raisins, pecans, pumpkin seeds, sesame seeds, flax seed and rosemary and stir just until blended.
Pour the batter into two 8”x4” (20cmx10cm) loaf pans that have been sprayed with nonstick spray. Bake for about 45 minutes, until golden and springy to the touch. Remove from the pans and cool on a wire rack.
The cooler the bread, the easier it is to slice really thin. You can leave it until the next day or pop it in the freezer. Slice the loaves as thin as you can and place the slices in a single layer on an ungreased cookie sheet. Slice so thin that they are almost lacy. Reduce the oven heat to slow 300°F/150°C/gas mark 2 and bake them for about 15 minutes, then flip them over and bake for another 10 minutes, until crisp and deep golden. You can also cut in half before the second baking. This is the way I like them. The size works better. Be careful not to burn.

Storage and Freezing Instructions/Tips:            Store in an airtight container at room temperature for up to 1 month. Prolong the freshness by freezing for up to 3 months.

Spicy Corn Crackers

From Arrowhead Mills
Servings: About 4 dozen

Ingredients:
½ cup (120ml) buttermilk
3 tablespoons (45 ml) vegetable oil
1 cup (240 ml) (170 gm) (6 oz) blue corn meal
½ cup (60 gm) (2 oz) pastry flour
¾ teaspoon (1½ gm) salt
¼ teaspoon (1½ gm) baking soda
1/8 teaspoon cayenne
½ teaspoon (3 gm) chili powder, or more, to taste
1 teaspoon (4 gm) garlic powder

Directions:
Preheat oven to moderate 350°F/180°C/gas mark 4. Combine buttermilk and oil. In separate mixing bowl, thoroughly stir together the dry ingredients. Add milk mixture and stir until dough forms a ball. Knead on floured board (adding a little more flour if necessary) about 5 minutes. Divide dough in half and roll each. Roll as thinly as possible. Cut into 2-inch squares. Sprinkle with additional salt or paprika. Bake in a preheated moderate oven on baking sheet lined with parchment paper for about 15 minutes. Be careful not to brown the bottoms. Cool slightly before removing from baking sheet, finish cooling on wire rack. Store in loosely covered container.

Storage and Freezing Instructions/Tips:Store in an airtight container at room temperature for up to 1 month. Prolong the freshness by freezing for up to 3 months.


Onion and Poppy Seed Crackers

From “Menus from an Orchard Table” by Heidi Noble featured on Sarah’s blog.
Servings: About 6 dozen

Ingredients:
1 medium onion
1 large egg
1/3 cup (80 ml) vegetable oil
2 teaspoons (10ml) (12 gm) salt
2 cups (480 ml) (280 gm) (10 oz) all-purpose (plain) flour
1 teaspoon (5 gm) baking powder
2 tablespoons (30ml) (18 gm) (2/3 oz) poppy seeds
1 tablespoon (15 gm) (½ oz) granulated sugar
1/4 teaspoon freshly ground black pepper

Directions:
In the bowl of a food processor fitted with the blade attachment, puree the onion. One medium onion will yield approximately 1 cup puree. Measure 1 cup puree and liquid from the onion and return to the food processor. Add the egg, oil and salt and blend until well incorporated.

In another bowl, measure the dry ingredients. Mix lightly to combine. Make a well in the center and add the liquids in this well. Mix in one direction until the dough is fully combined. Lightly knead the dough, flouring as needed, for 2 minutes. Wrap tightly in plastic wrap and rest in the refrigerator for 1 hour.

Preheat oven to moderate 350°F/180°C/gas mark 4.

This is a very soft dough and you may find it best to roll it between two sheets of parchment paper. Roll as thinly as possible. In fact, it is best if rolled as thinly as a strudel dough. But don't worry if you can't get it that thin. The crackers will still be fine. Cut into desired shapes.

Bake until evenly golden. The time required will depend upon thickness but anywhere from 5 - 15 minutes. If they are thicker, the crackers will puff up like little pitas. Cool thoroughly before storing in air tight container.

Storage and Freezing Instructions/Tips: Store in an airtight container at room temperature for up to 1 month. Prolong the freshness by freezing for up to 3 months.

Herbed Flatbread

Servings: About 16 pieces

Ingredients:
1 cup (240 ml) warm water (about 110°F/43°C)
1 teaspoon (5 ml) (2 ¾ gm) active dry yeast
3 cups (720 ml) (420 gm) (15 oz) all-purpose (plain) flour, plus more for rolling
3 tablespoons (45 ml) of extra virgin olive oil
coarse salt
1 teaspoon (5 ml) (5 gm) sugar
1 large egg whisked with 1 tablespoon (15 ml) water, for egg wash
sea salt, for sprinkling
1/4 cup (60 ml) (7 gm) (¼ oz) fresh rosemary or thyme

Directions:
Place the water in a medium sized bowl and sprinkle the yeast. Let stand until the yeast is foamy, about 5 minutes. Stir in flour, oil, 2 teaspoons coarse salt, and the sugar. Stir until a dough forms.

Turn out dough onto a lightly floured surface and knead until smooth, about 2 minutes. Use as much flour as necessary so it is not a sticky dough. Place in a lightly oiled bowl and roll the dough around in the bowl so that it is also lightly oiled on the surface. Cover with saran wrap. Let stand in a warm place until it doubles in volume, about 1 hour.

Preheat oven to moderate 350°F/180°C/gas mark 4. Divide dough into 16 equal portions and cover with plastic wrap. Roll out each piece to approximately 4"x10" (10cm x 26cm) on a lightly floured surface. Transfer to parchment lined baking sheet. Brush with the egg mixture and sprinkle with sea salt and herbs.

Bake, rotating sheet halfway through baking, until crisp and golden, 18-22 minutes. Let cool on the baking sheet then transfer to a wire rack to cool completely.

Storage and Freezing Instructions/Tips:            Store in an airtight container at room temperature for up to 1 month. Prolong the freshness by freezing for up to 3 months.

Disclaimer:
The Daring Kitchen and its members in no way suggest we are medical professionals and therefore are NOT responsible for any error in reporting of “alternate baking/cooking”. If you have issues with digesting gluten, then it is YOUR responsibility to research the ingredient before using it. If you have allergies, it is YOUR responsibility to make sure any ingredient in a recipe will not adversely affect you. If you are lactose intolerant, it is YOUR responsibility to make sure any ingredient in a recipe will not adversely affect you. If you are vegetarian or vegan, it is YOUR responsibility to make sure any ingredient in a recipe will not adversely affect you. The responsibility is YOURS regardless of what health issue you’re dealing with. Please consult your physician with any questions before using an ingredient you are not familiar with. Thank you!

__________________
Sarah G


Crackers e flatbreads


Dopo aver preparato a gennaio la Gevulde Speculaas, la stupenda, croccante crostata ripiena, a febbraio Daring Bakers  volta pagina.  La nostra nuova padrona di casa,  del  Daring Bakers Challange, Sarah di All Our Fingers in the Pie,  ha scelto per noi ricette per crackers  e  focaccine croccanti .

Io ho cominciato con le focaccine croccanti alle erbe che ci sono piaciute moltissimo. Ho scelto di aromatizzarle con il rosmarino e le abbiamo mangiate calde, appena sfornate, accompagnate con lo stracchino. Buonissime. Unica differenza rispetto alla ricetta originale, io non ho spennellato con l'uovo prima della cottura. Un po' di colesterolo in meno, qua e la!


DSCN1536 - Flatbreads1


FOCACCINE ALLE ERBE

per 16 focaccine

Ingredienti:
1 tazza (240 ml) di acqua tiepida (circa 110°F/43°C)
1 cucchiaino (5 ml) (2 ¾ g) di lievito di birra disidratato
3 tazze (720 ml) (420 g) (15 oz) di farina 00 , più quella necessaria per
3 cucchiai (45 ml) di  olio extra vergine di oliva 
sale grosso
1 cucchiaino (5 ml) (5 g) di zucchero
1 uovo grande, sbattuto con un  cucchiaio (15 ml) di acqua per spennellare l'impasto,
sale marino, per  
1/4 tazza (60 ml) (7 g) (¼ oz) rosmarino fresco o timo

A mano
Mettere l'acqua in una ciotola di medie dimensioni e versarvi il lievito. Lasciarlo sciogliere e formare la schiuma (non sempre accade, ma non preoccupatevi) per circa 5 minuti. Aggiungere la farina, l'olio, 2 cucchiai di sale grosso, zucchero. Impastare.

Trasferire l'impasto sulla spianatoia leggermente infarinata e lavorare per circa due minuti, finché l'impasto sia diventato liscio. Se serve, aggiungete farina (a me non è servito). Oliare l'impasto e mettere a lievitare in una ciotola per circa un'ora. (Io questo passaggio non lo faccio mai, perché so che l'olio inibisce la lievitazione, Spolvero la ciotola con pochissima farina, sistemo l'impasto e sigillo con la pellicola, anzi ultimamente con i coperchi appositi della silkomart). Lasciar lievitare in un luogo tiepido  fino al raddoppio. (tempo indicativo 1 ora).

Preriscaldare il forno a 350°F/180°C/gas mark 4. Dividere l'impasto in 16 porzioni di uguale peso e coprirle con pellicola . Stenderle una ad una ad una misura di circa 10cm x 26cm (io le ho fatte tonde), sulla spianatoia leggermente infarinata. Trasferirle su una placca da forno rivestita con carta forno. Spennellare con l'uovo sbattuto e cospargere con sale marino e le erbe scelte.

Cuocere, girando di 180 gradi la placca da forno a metà cottura finchè le focaccine siano diventate croccanti e dorate, 18-22 minuti. Lasciare stiepidire e trasferire su una griglia e farle raffreddare completamente.


Monday 25 February 2013

La Red Velvet Cake in brutta copia per MTC febbraio 2013


DSCN1603 - Red velvet cake


E sì, questa è proprio la brutta copia, fatta all'ultimo momento ma con tanto amore, ma la mia non è cresciuta come immaginavo avrebbe dovuto. Di solito non ho mai problemi con le torte. Allora usiamo questo post per capire cosa ha causato l'insuccesso. OK?

La mia prima sensazione è la temperatura del forno. Nel mio forno di solito le torte le cuocio a 180°C, ma ho seguito le spiegazioni ed ho cotto a 175°C (che magari erano pure meno, perchè si sa che i forni casalinghi non sono molto precisi, e il mio possiede ancora una manopolina e non un indicatore eletronico della temperatura). La torta era lì che non si muoveva. Non avevo mai usato bicarbonato ed aceto per la lievitazione e quindi avevo inizialmente in testa un problema di lievitazione. Poi però ho pensato al calore del forno. Con le dovute eccezioni, di solito, la temperatura indicata nella ricetta va adattata al proprio forno e forse questa non era una dovuta eccezione, come inizialmente avevo pensato.
Così ho ho deciso che avrei alzato il forno ed in effetti la poverina si è in un certo qual modo ripresa, mostrando segni di vita e crescendo con tanto di cupoletta. Ma senza raggiungere altezze degne di una layer cake.

Un'altra variabile è il quantitativo di bicarbonato che ho usato, forse per cucchiaino si intendeva proprio la misura anglosassone "teaspoon"? E allora, ne ho messo poco di meno, utilizzando la misura italiana. Essendo la ricetta convertita in italiano ed essendo le misure di peso convertite in grammi, ho usato solo misure standard italiane. Ho fatto male?

Altra variabile, non possedendo due tortiere piccole ed identiche in diametro, ho utilizzato un'unica forma di carta per panettone. Ma sinceramente non credo che il "peso" di un impasto di così piccola entità abbia influito sulla lievitazione. Ma dite la vostra...

Pazienza! Ce la mangeremo ugualmente. C'era Siahrei che mi girava intorno dopo cena, mentre la farcivo, ed attende l'ora di pranzo domani per la sua bella fetta di dolce. Ma...giuro, Stefania, che la riproverò per vedere come deve essere l'originale. Dammi quindi qualche chiarimento. La tua è così bella, altissima. Wow!!!!!!!!!!!! La voglio replicare.

Un bacione a Stefania, Alessandra, Daniela e Giorgia.

Notte :)


Ed eccovi la ricetta ed i commenti che ci ha dato Stefania vincitrice a gennaio dell'MTC.

la Red Velvet Cake - gluten free di Stefania di Cardamomo & Co.


Red Velvet Cake
160 gr di farina di riso sottilissima tipo amido (Le Farine Magiche Lo Conte, Pedon, Rebecchi)
60 gr di fecola (Cleca, Pedon, La Dolciaria, Sma & Auchan)
30 gr di farina di tapioca (che potete sostituire con Maizena)
1/2 cucchiaino da tè di sale
8 gr cacao amaro (Venchi, Easyglut, Pedon, Olandese
110 gr burro non salato a temperatura ambiente
300 gr di zucchero
3 uova medie (io uso quelle bio codice 0, ma non è rilevante ai fini della celiachia)
1 cucchiaino da caffè di estratto vaniglia bourbon (o i semi di una bacca, ma non usate la vanillina)
240 ml di buttermilk (ma se non lo trovate, fate inacidire per 20 minuti la stessa quantità di latte con un cucchiaio di limone)
1 cucchiaio di colorante rosso (Rebecchi e Loconte)
1 cucchiaio di aceto bianco
1 cucchiaino da tè di bicarbonato di sodio
Pre-riscaldate il forno a 175°C.
In un recipiente mescolate le farine, il sale, il cacao. In un altro recipiente, sbattete il burro per 2-3 minuti, finché sarà soffice e poi aggiungete lo zucchero e sbattete per altri 3 minuti.
Aggiungete le uova, una alla volta, sbattendo 30 secondi dopo ogni aggiunta.
Mescolate il colorante al buttermilk e quindi versate poco per volta al composto di burro, alternando le polveri al buttermilk. Possibilmente iniziate e finite con la farina. Aggiungete anche la vaniglia e mescolate.
In una tazzina (capiente) mescolate il bicarbonato all’aceto bianco, facendo attenzione a versarlo subito nell'impasto (altrimenti ve lo troverete per tutta la cucina) e incorporatelo bene con una spatola.
Imburrate due teglie da 18/20 cm e spolverizzate con farina di riso. Fate cuocere per 40/45 minuti, o finché non vedete che è cotto (con il trucchetto dello stuzzicadenti!)
Lasciate raffreddare la torta dentro la teglia (potete usarne anche una in silicone, ma è meglio usare la  carta forno per evitare contaminazioni) per 10 minuti. Poi toglietela dalla teglia e lasciatela raffreddare, quindi fasciatela nella pellicola trasparente. Fatela riposare in frigo per diverse ore (io l'ho lasciata tutta la notte). In questa maniera sarà più facile da tagliare senza che si sbricioli e sarà più semplice mettere la farcitura. Non spaventatevi se vi sembra troppo dura, perché a temperatura ambiente tornerà morbidissima.
Questa è la ricetta base, a questa si possono aggiungere infiniti sapori. Si può conservare in frigo in un contenitore ermetico e riutilizzare quando se ne ha bisogno.

Io ho farcito con la classica

Butter cheesecream

Ingredienti:
220 gr - formaggio cremoso tipo Philadelphia (cioè una confezione grande)
120 gr - burro morbido
140 gr - zucchero a velo (Eridania, Pedon, La Dolciaria, Sma&Auchan, Cannamela, Arpa)
1 cucchiaino di scorza di limone bio grattugiata
lamponi surgelati (ma freschi è meglio!)
codette rosa e cuoricini (Lo Conte)

Procedimento:
Sbattete bene il burro finché è cremoso. Quindi unite lo zucchero, la scorza del limone e il formaggio e sbattete per almeno 5 minuti. A questo punto potete farcire la torta. Se vi sembra troppo morbida, potete lasciarla riposare un po' in frigo e il burro la farà compattare di nuovo. La crema va conservata in frigo, anche se a temperatura ambiente non si scioglie.
Questa è una torta abbastanza umida che non ha bisogno di essere bagnata per essere farcita, quindi si presta splendidamente alle torte in pasta di zucchero. Ma se lo scopo vostro, non è rivestirle, potete bagnare un po' gli strati, per renderla più simile al sapore delle nostre torte.
A questo punto, farcite la torta, senza bisogno di bagnarla, io ho farcito anche con dei lamponi a pezzi, sia messi nella crema che in ogni strato interno e poi ho coperto il tutto con la crema.
Quindi con tanta pazienza, lanciando le codeste verso la torta, cercate di appiccicarle ai bordi della torta. Spargete anche sopra e decorate con i cuoricini (per il vostro Valentino) e un lampone al centro.

Servitela però a temperatura ambiente, perché è molto più buona e dura anche tre giorni se la conservate in frigorifero.

Con questo post partecipo all'MTC di febbraio 2013